This is part two of our front yard project, check out DIY Front yard (Part 1/2) – Porch makeover using Techo Bloc Venetian if you are interested.
Planning – Permacon Rosebel vs Mega Arbel
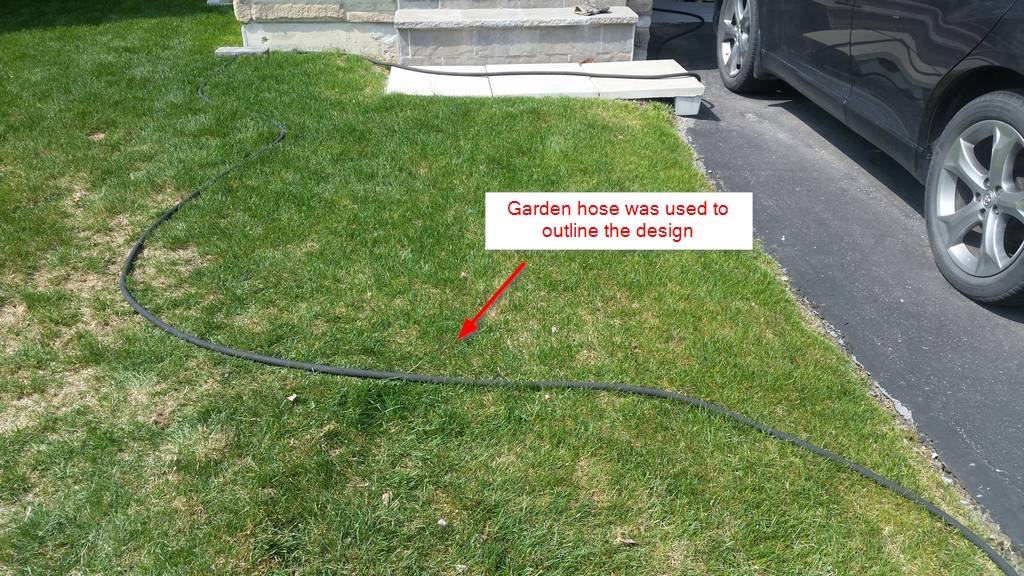
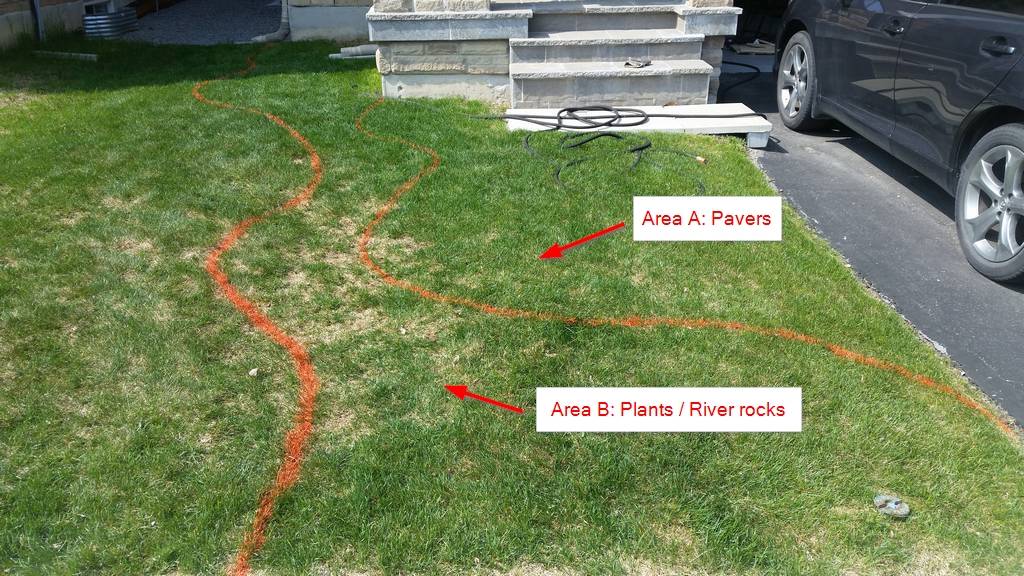
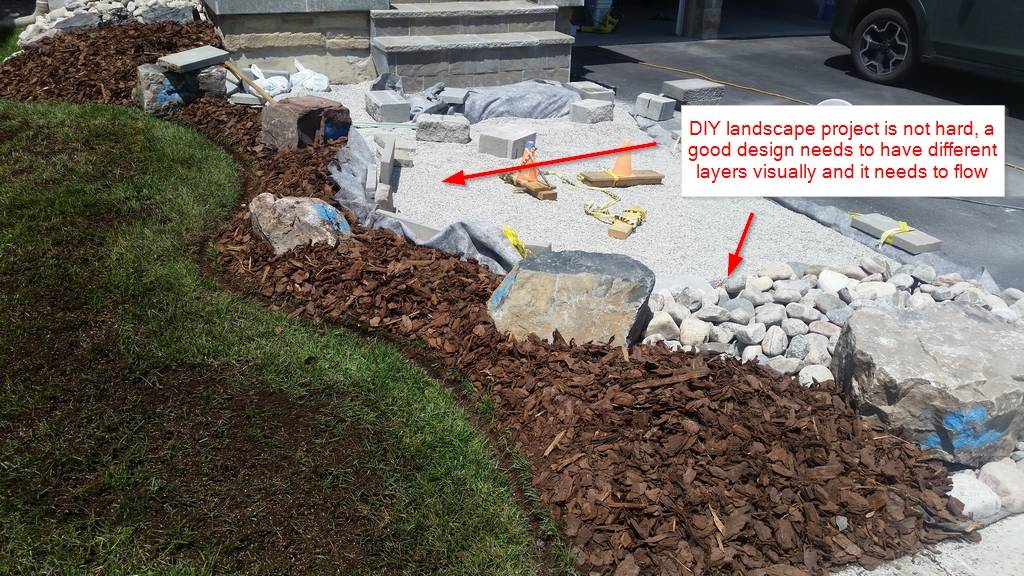
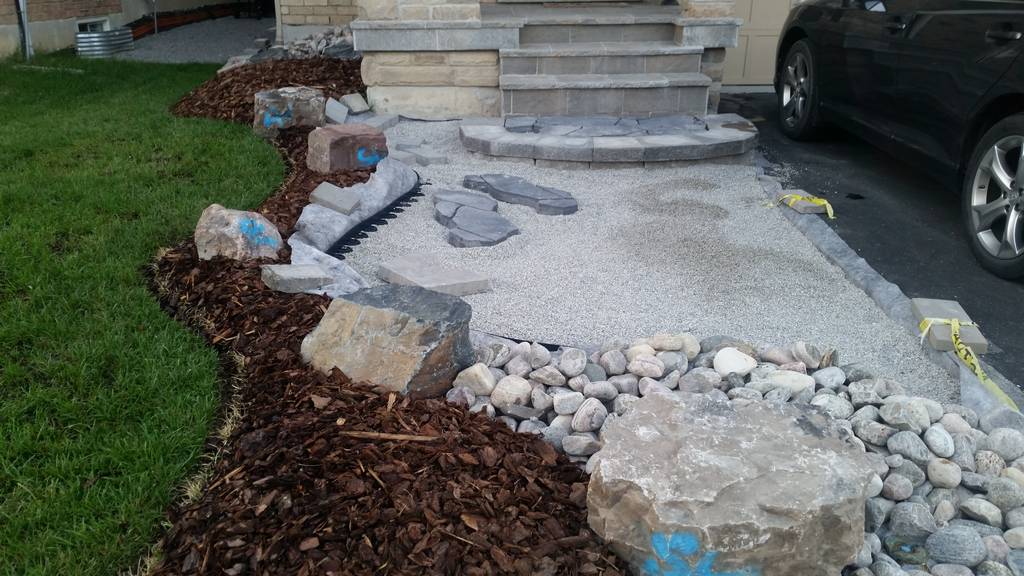
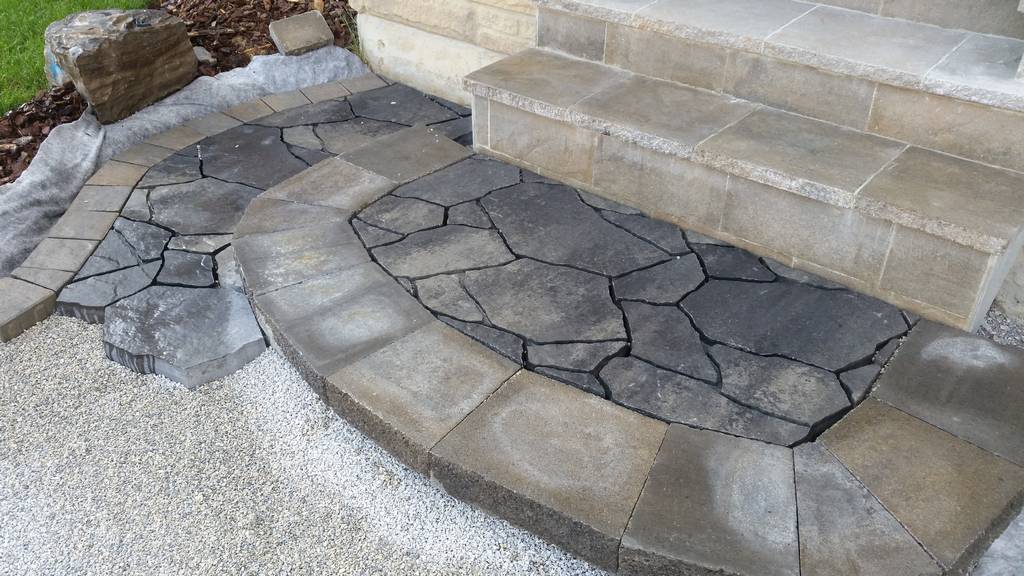
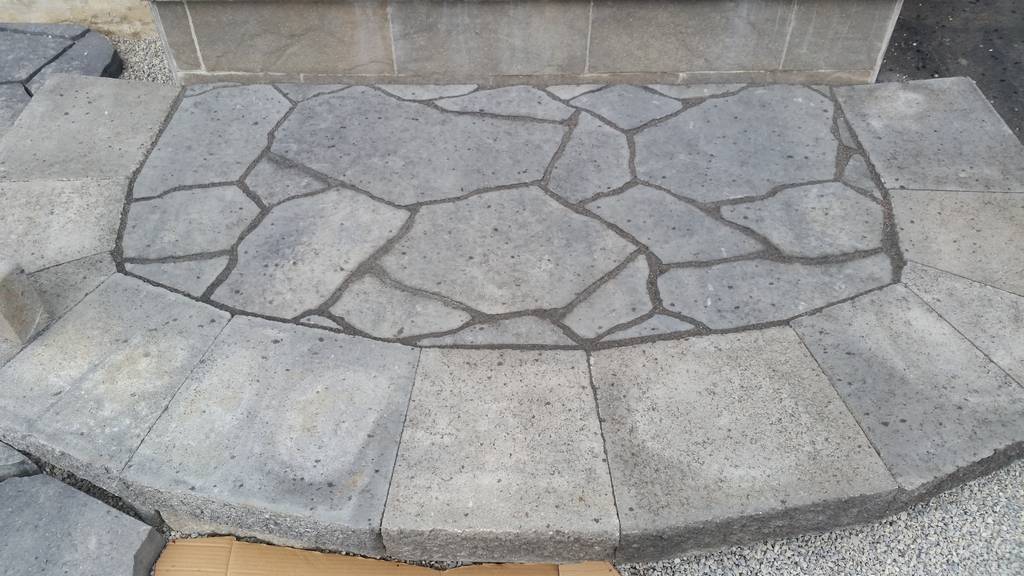
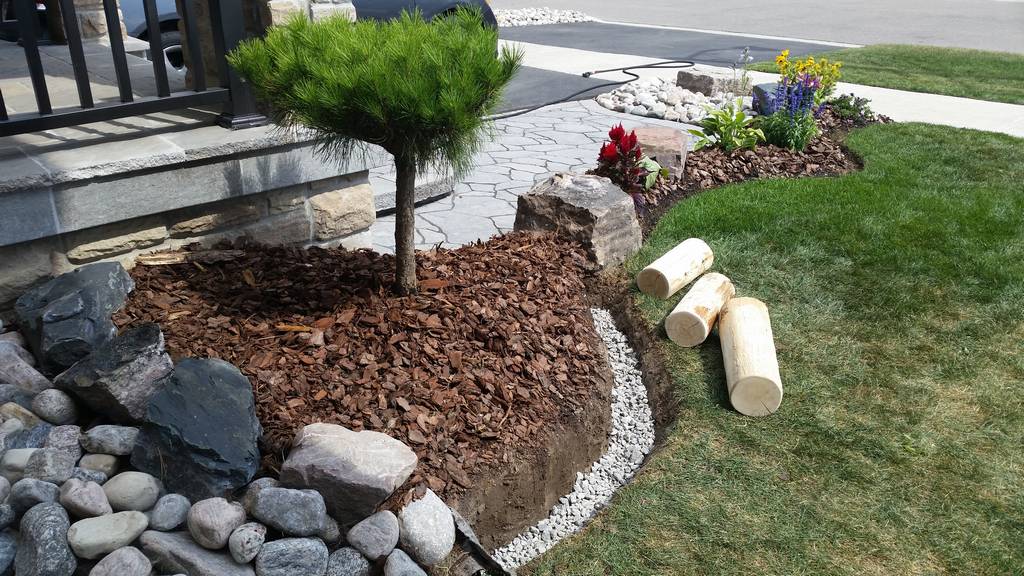
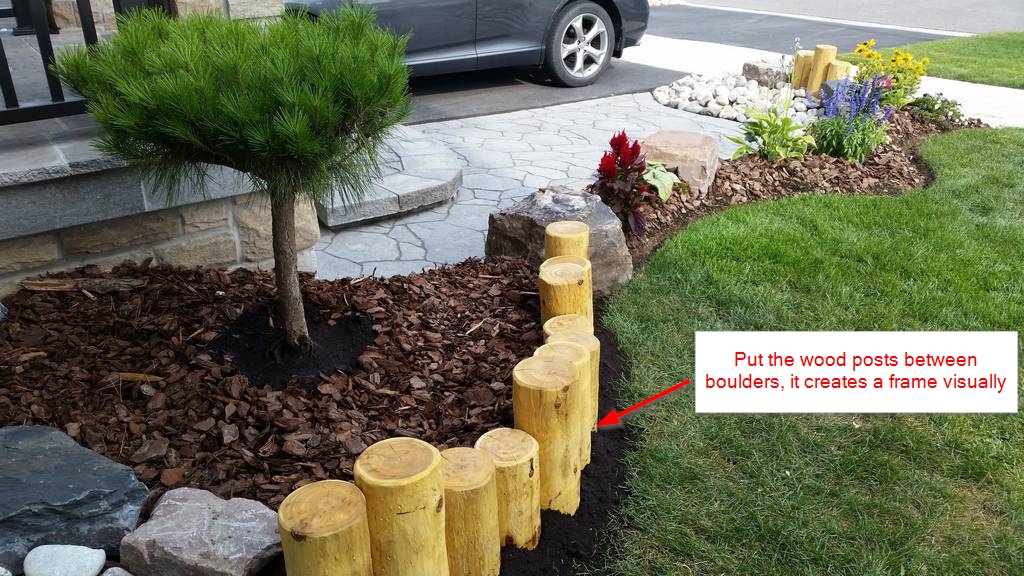
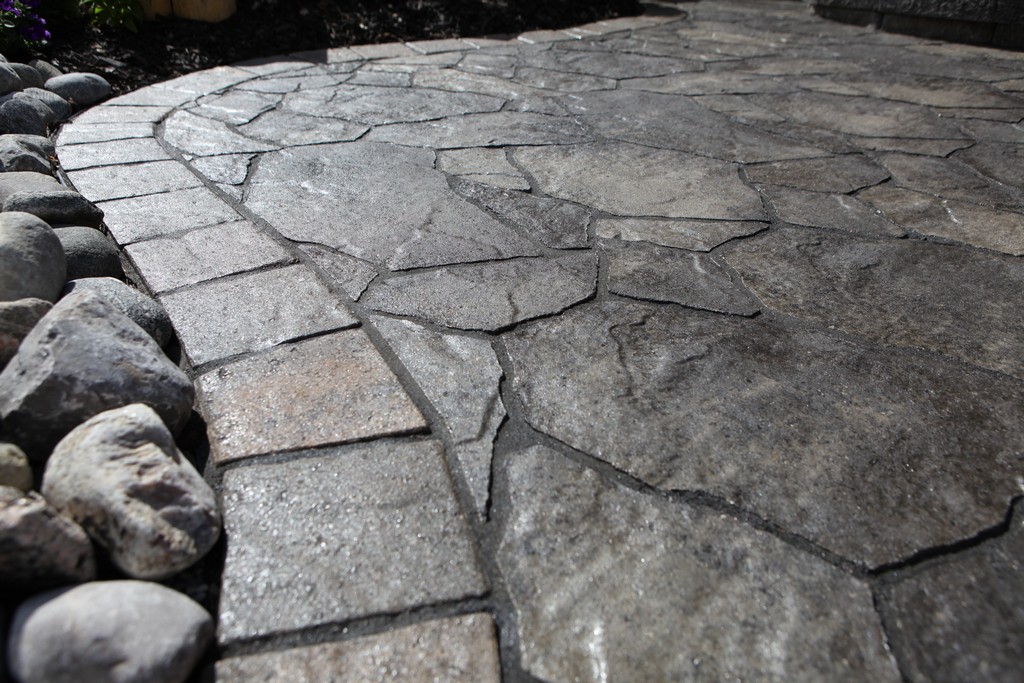
There are tons of information on the Internet, so planning wasn’t that too difficult. Since every house is different, you can integrate multiple ideas from the Internet into your home, Houzz is an excellent resouce. In my design, I chose the most challenging one – curves with Permacon Rosebel slabs and then wrapped around it with flower bed, river rocks, boulders and cedar posts.
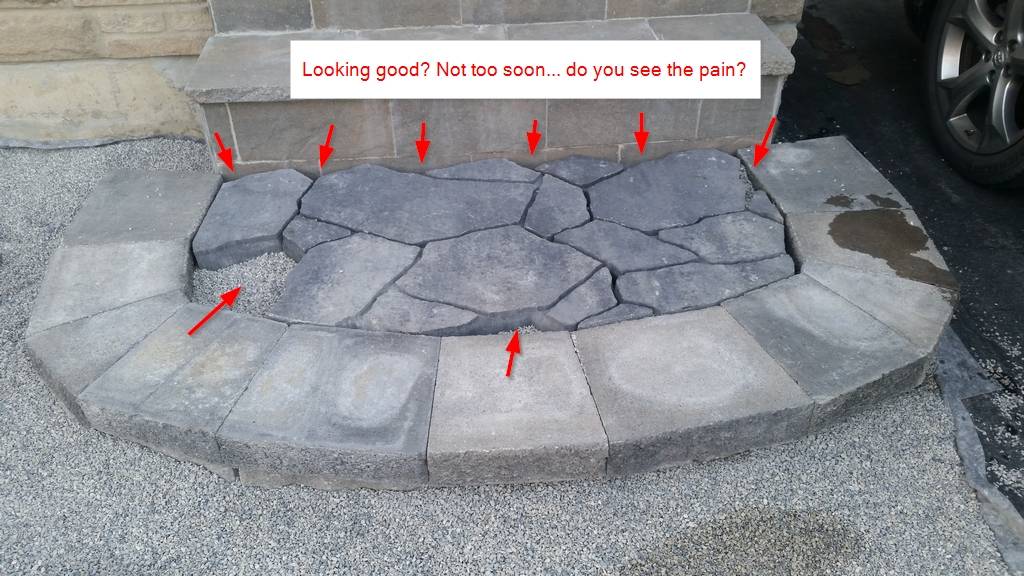
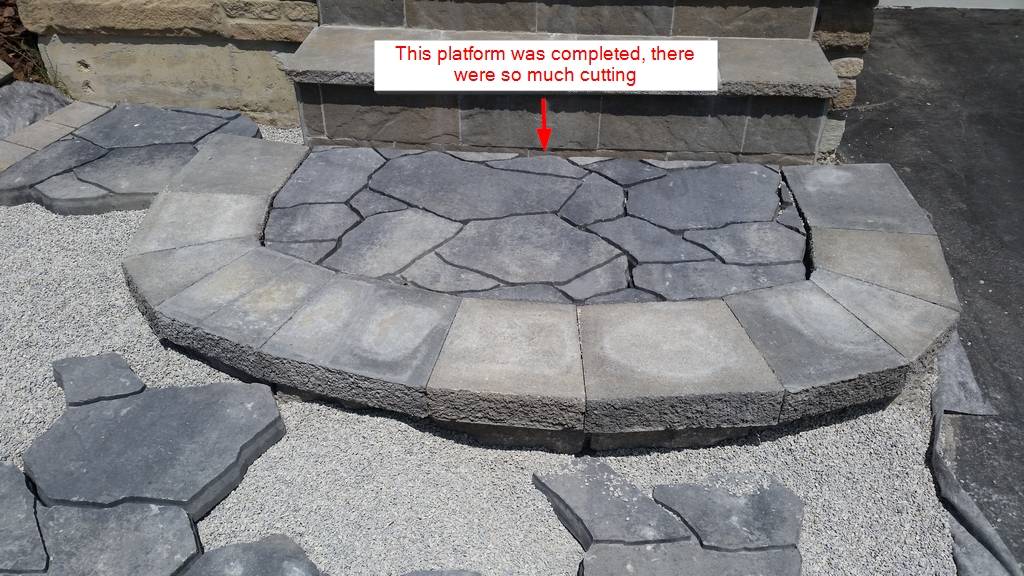
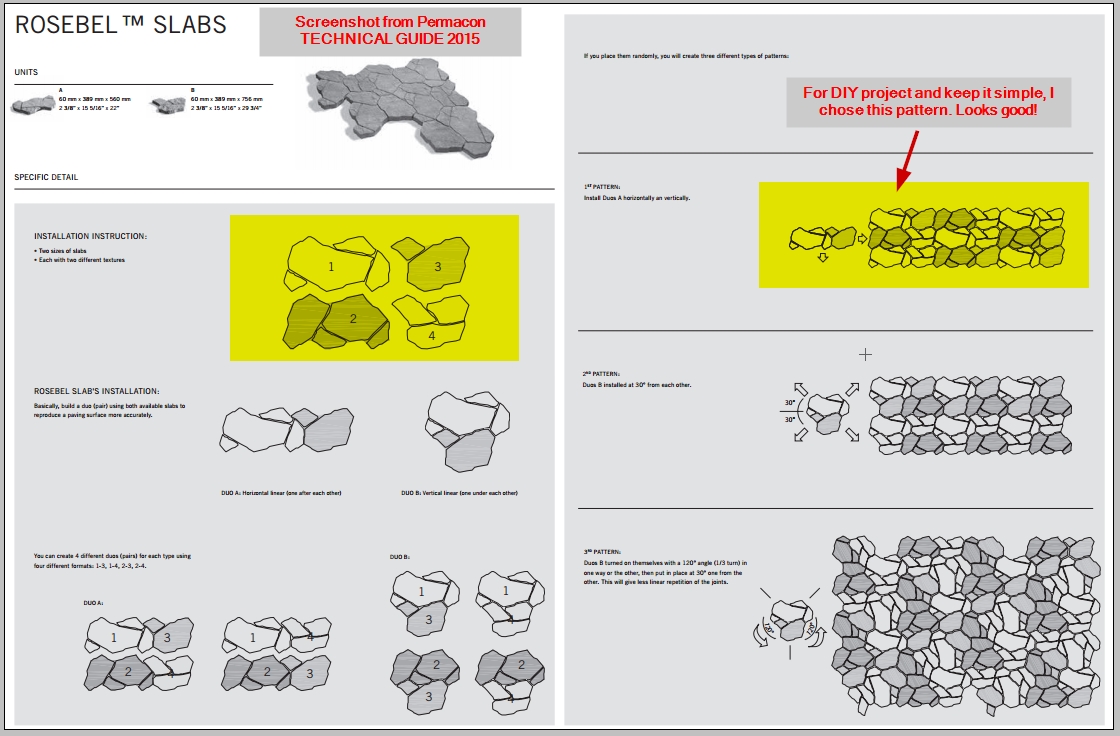
We looked at other brands of pavers but Permacon has the most random look on the flag stone alike slabs. Permacon’s Mega Arbel was another choice but the thickness (3 1/8″) wasn’t fun for DIY, so we went to Permacon Rosebel for the look and thickness (2 3/8″ only). The down side for these flag stones are, they are so big in size and heavy. It is not fun to move them around and require tons of cuttings, not to mention it wastes quite a lot especially for curves design.
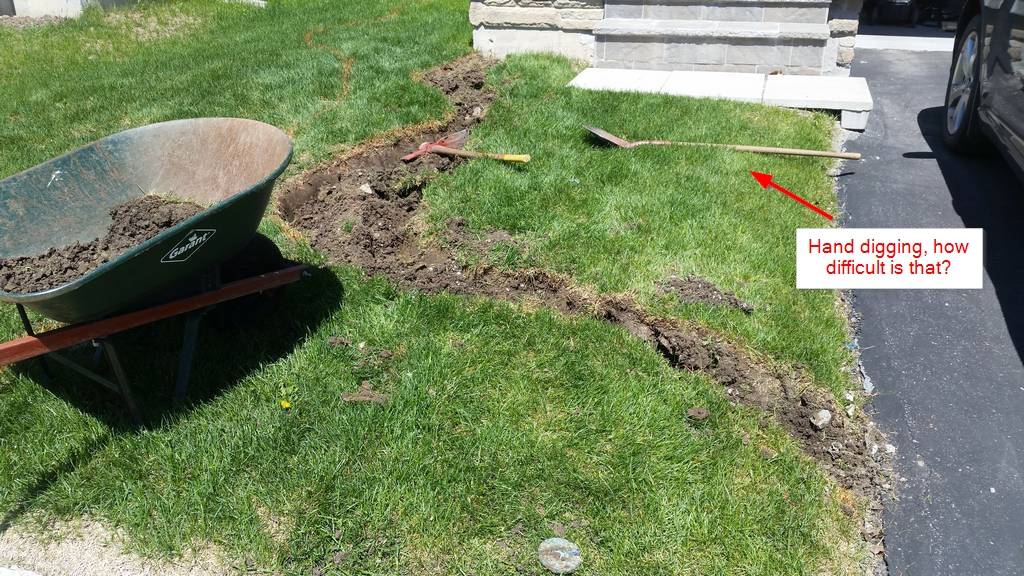
Excavation + HPB base
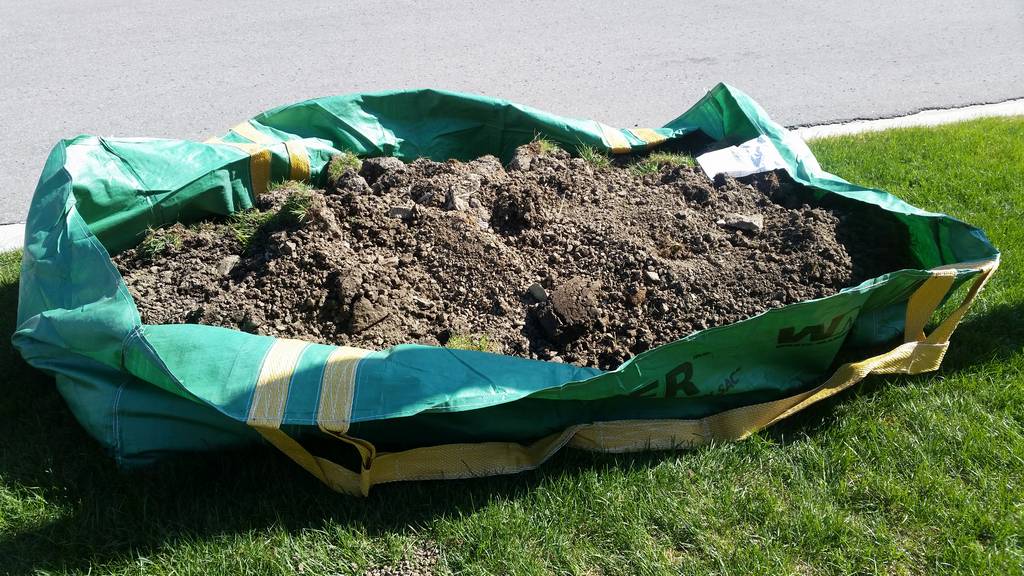
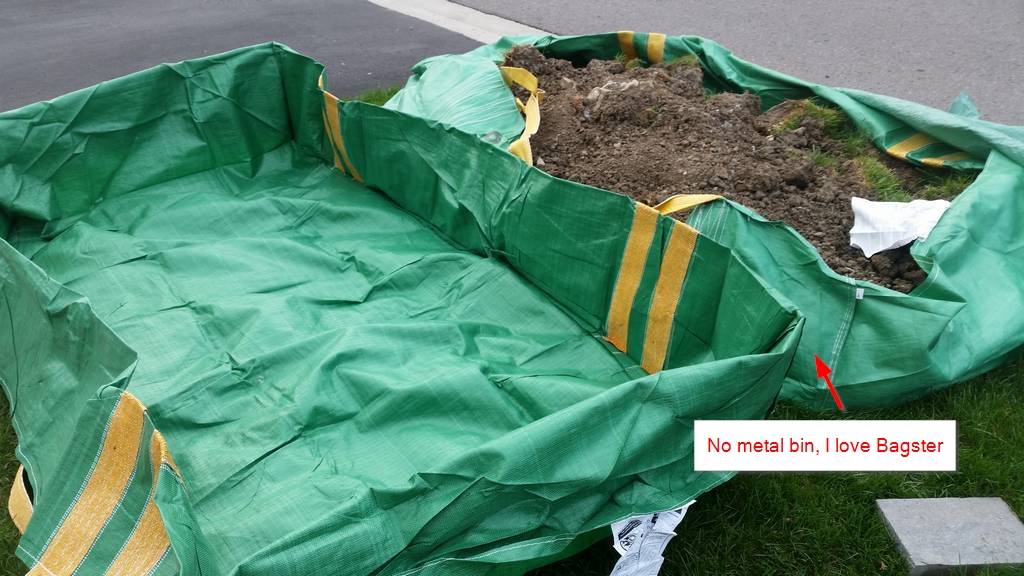
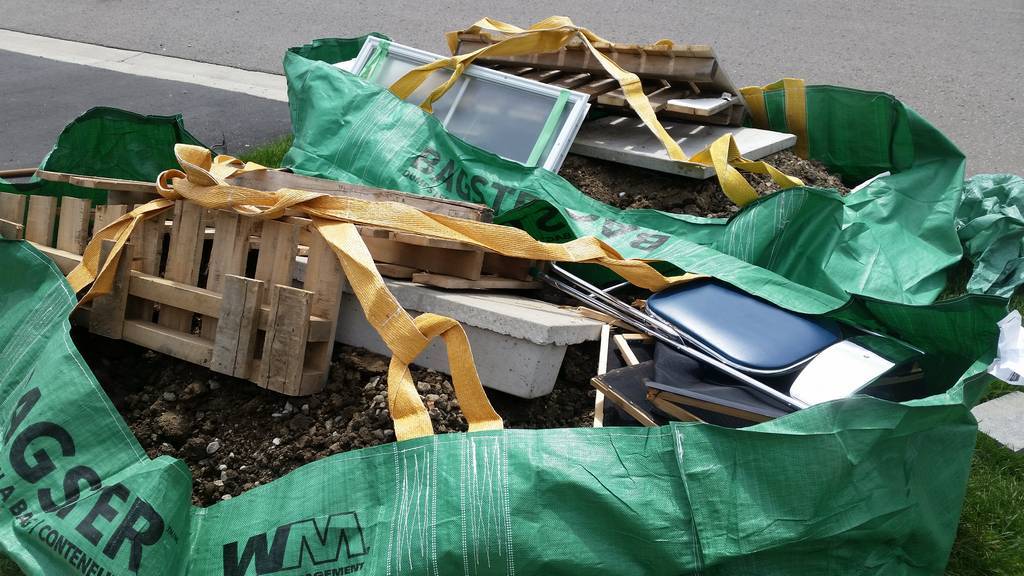
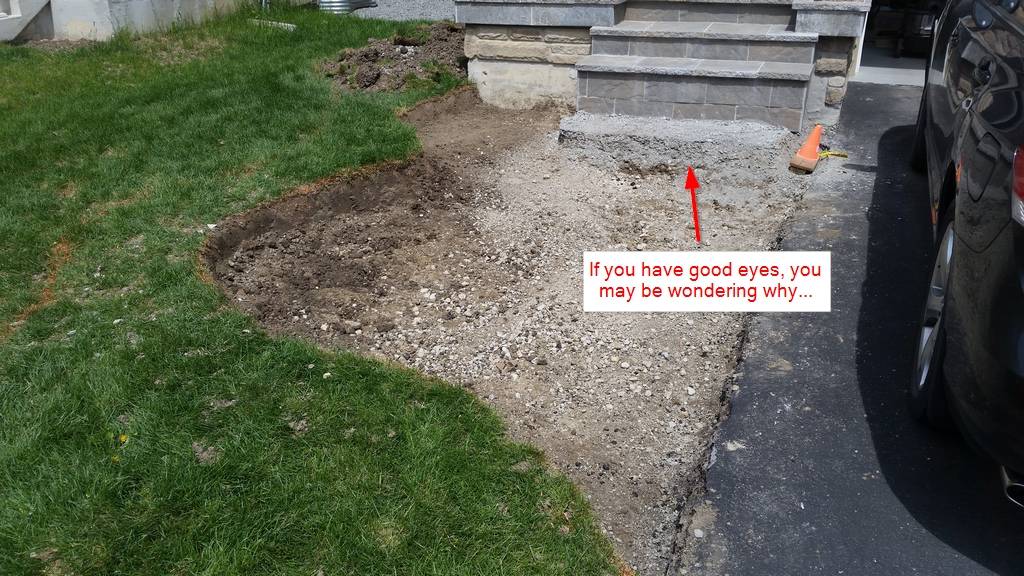
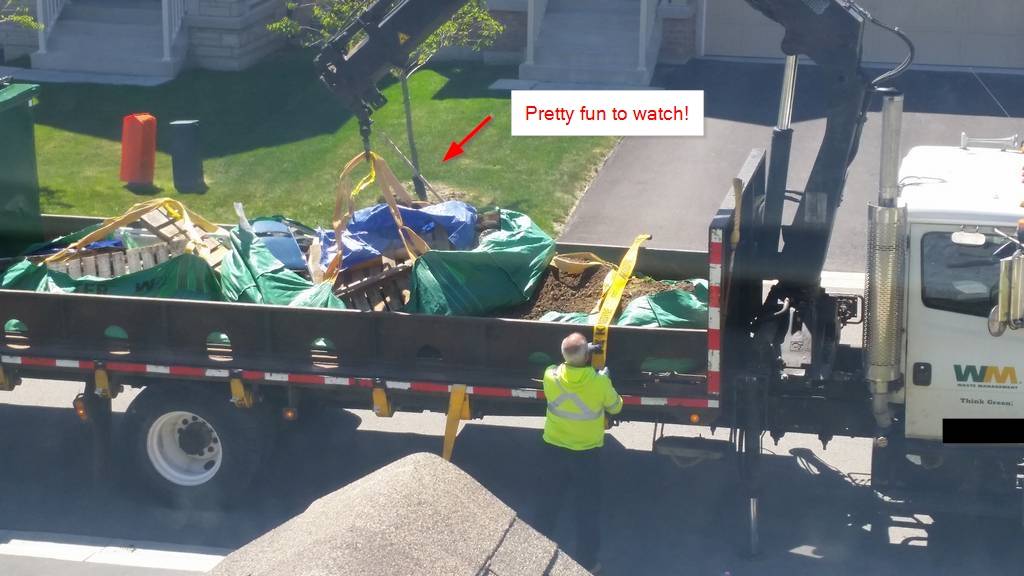
Renting a metal bin was probably cheaper but Bagster was my alternative as it does not have the time constraint, you can take as long as you want. Hand excavation was not difficult if you do it in May/June when the soil is still soft, if you choose to do it in July/Aug, good luck to you. Ideally, you need to dig around 8″ – 12″ to have a solid base, but seriously the walkway does not have heavy traffic, so even 6″ – 8″ base is good enough.
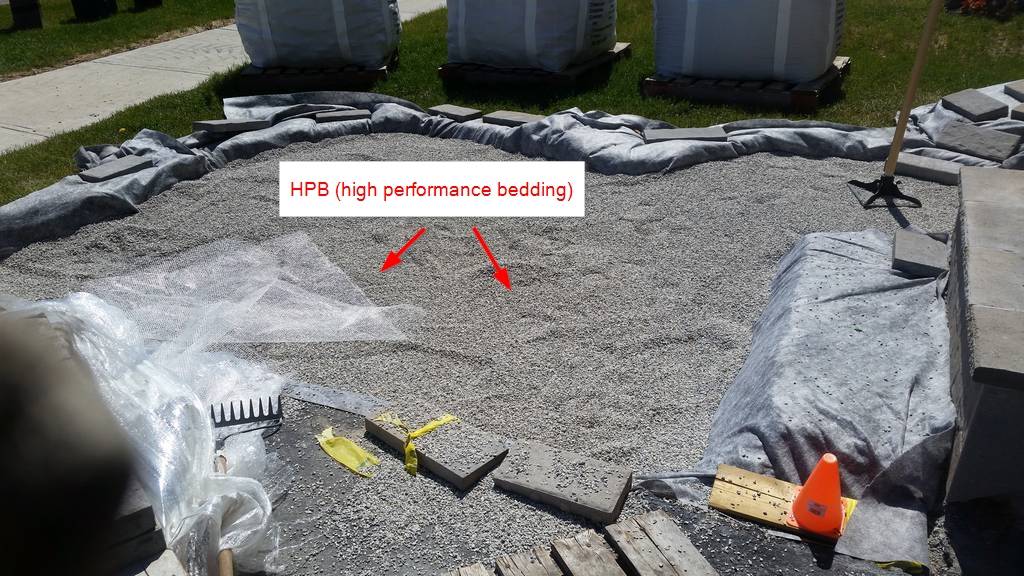
With no car is going to be parked on the walkway, I did not have to do the traditional crusher run compact and screening layers as the base, instead I chose HPB (High Performance Bedding) which does not need to compact at all. Google it if you want more information.


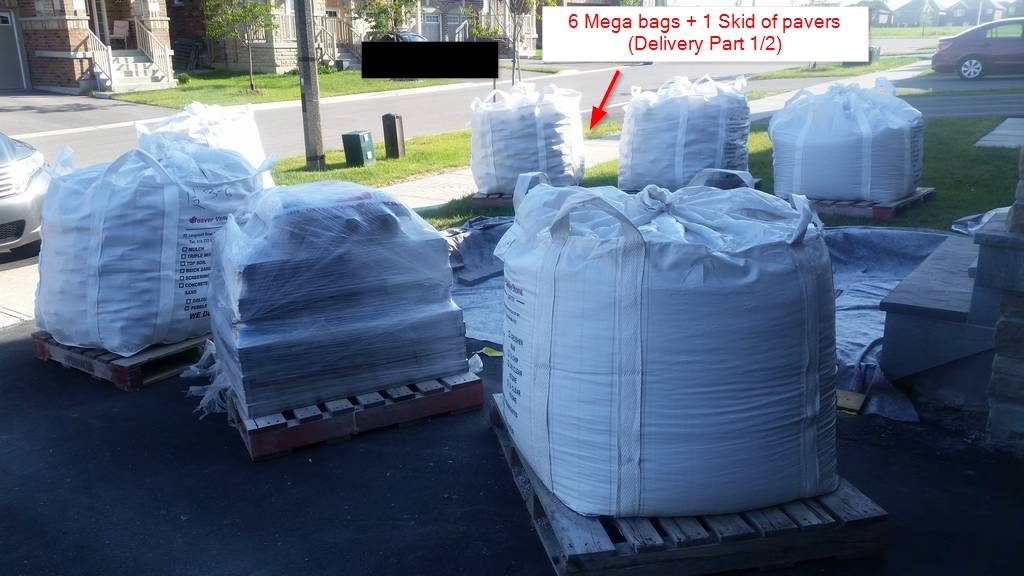


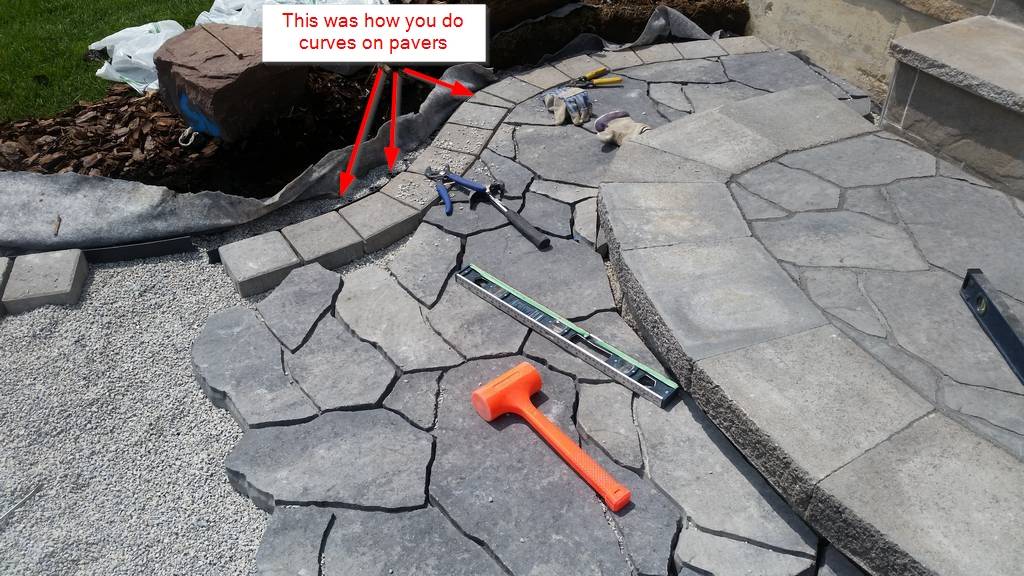
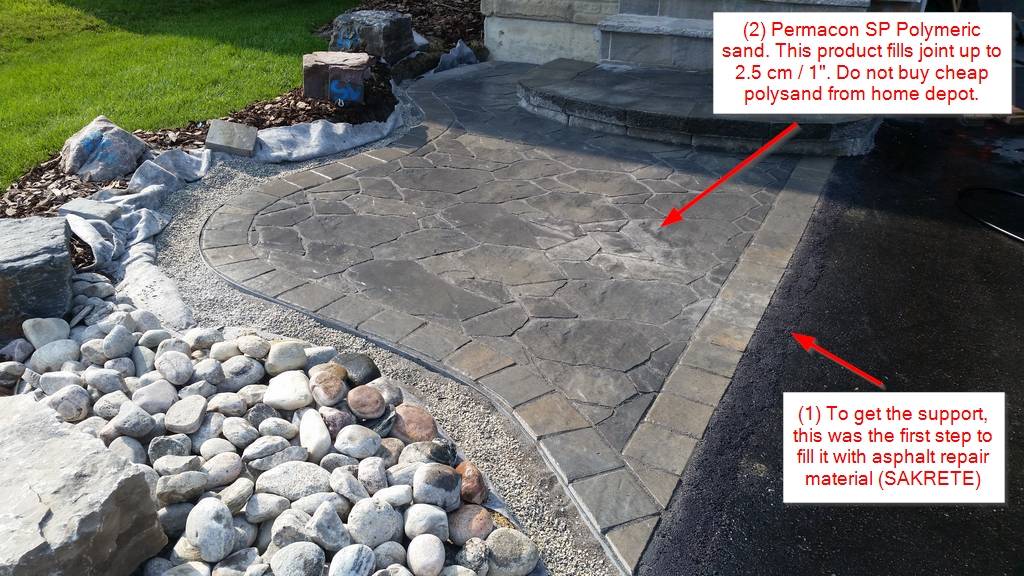
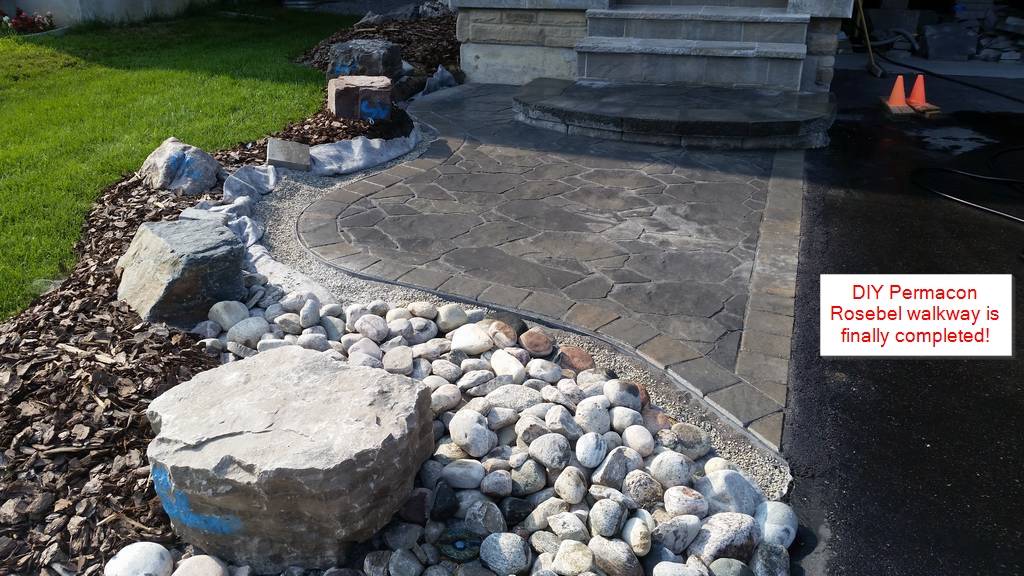
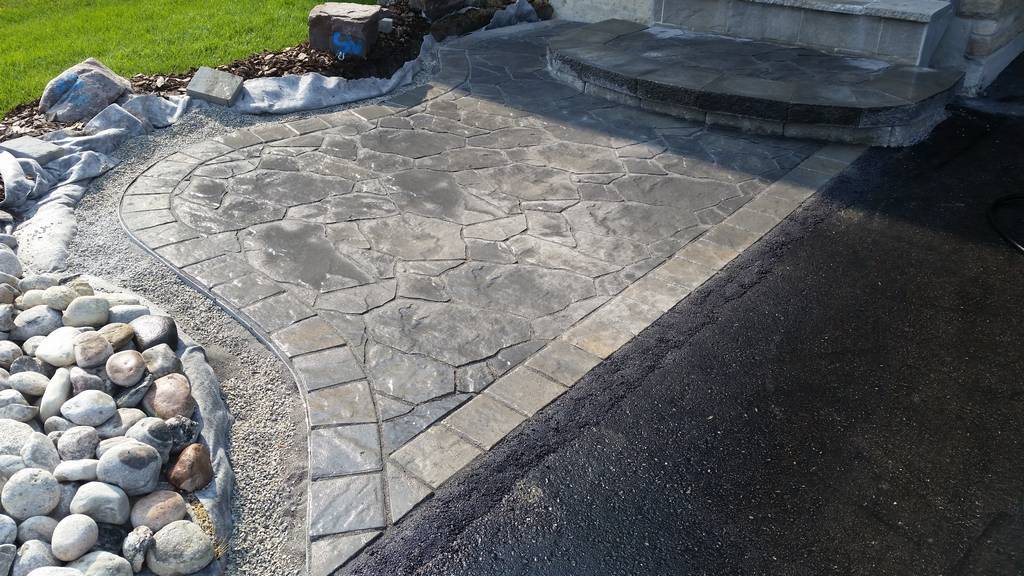


Installation Process – One person as usual
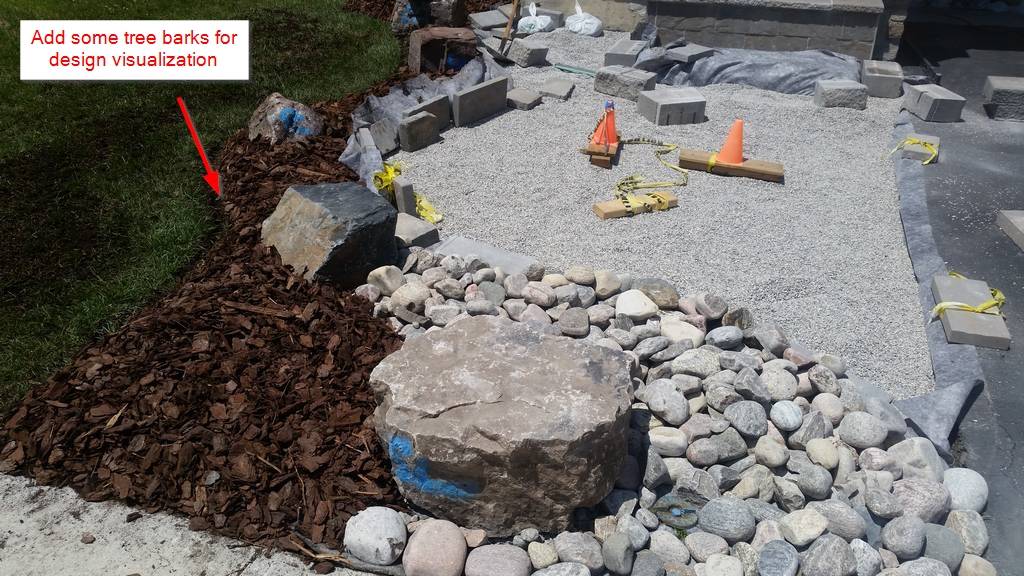
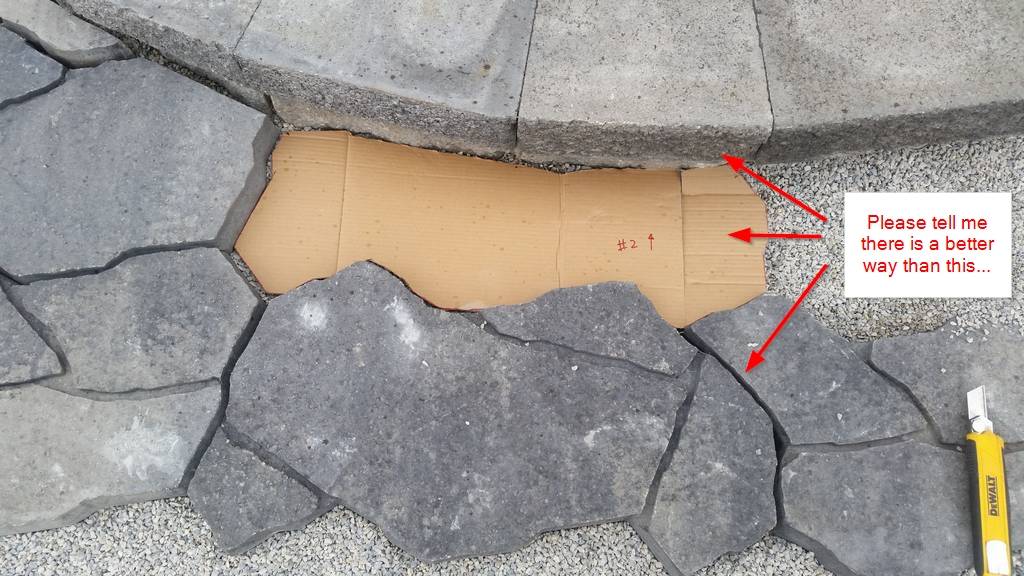
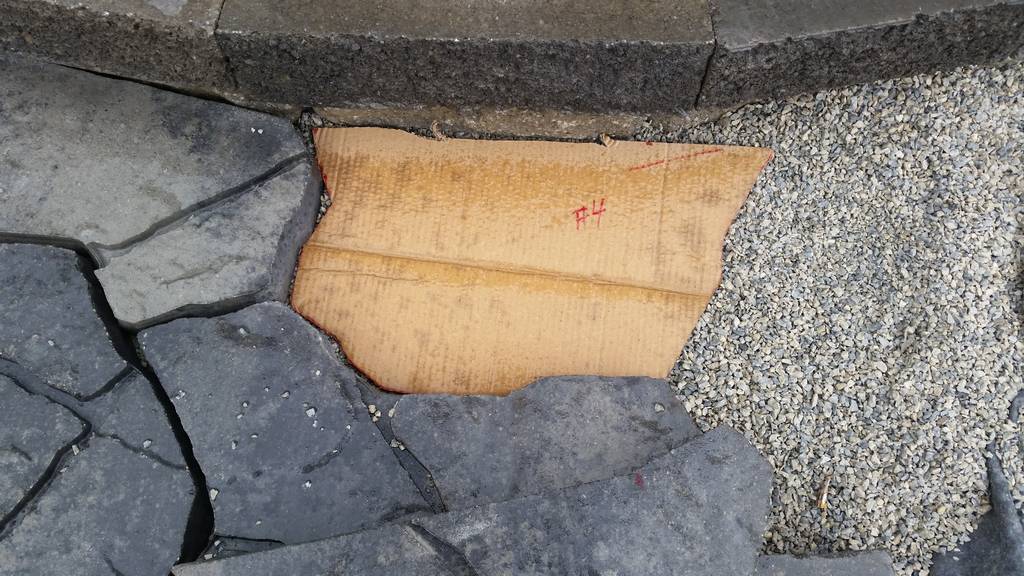
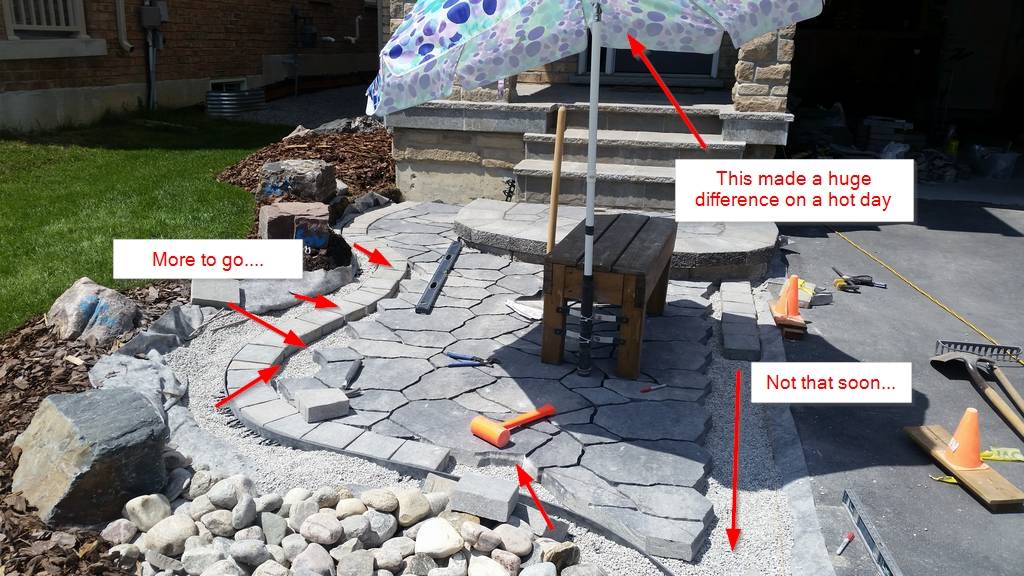
I have added comments in the photos, so it is pretty self explanatory. It took me around two month to finish everything as I only worked on weekends and some weekdays after work. I was so proud of myself, one person with NO extra help at all, especially moving over 10+ tons of material by myself!! I threw away 6-7 pairs of gloves after this project.
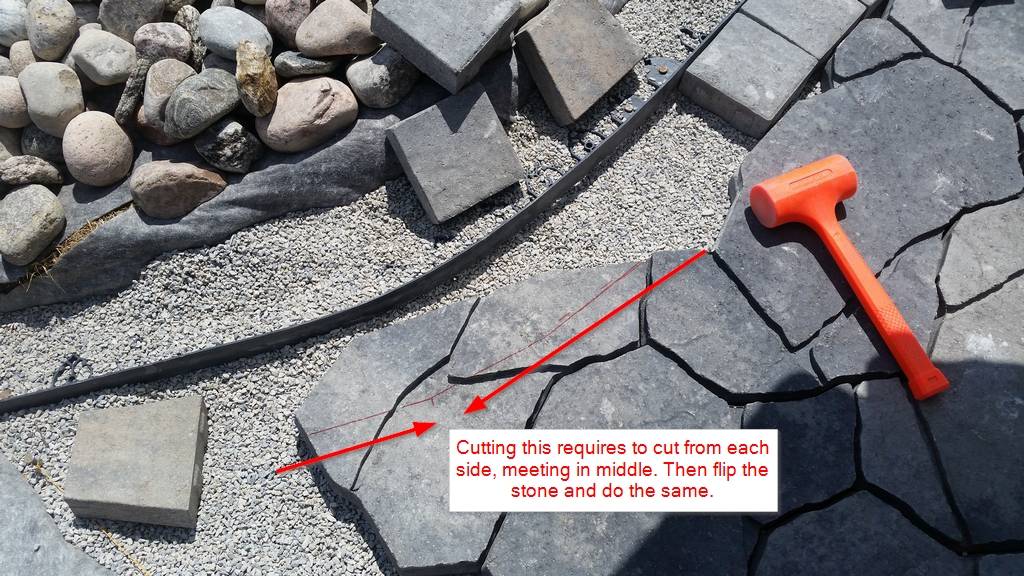
Tips: Rent a 14″ gas concrete saw to cut all the big slabs and leave the small one to your 7 1/4″ circular saw (diamond blade is a must) and 4 1/2″ angle grinder (abrasive blade is good) for detail grinding.
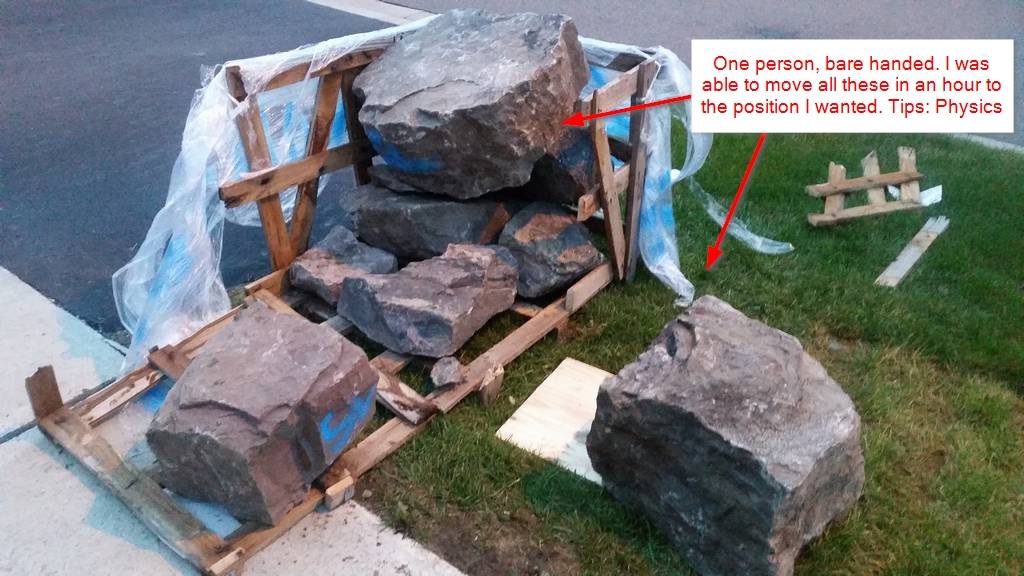
How to move boulders by hand?
Those boulders were huge, you may wonder how I moved them without a Bobcat. The trick is to minimize the friction (basic Physics) by using a plywood underneath. You need 2 pieces of plywood – switching them alternatively. If the boulder is sitting on the grass or concrete, you are screwed. Once it’s on the plywood, you flip or rotate the boulder to your target location. It wasn’t too difficult at all.
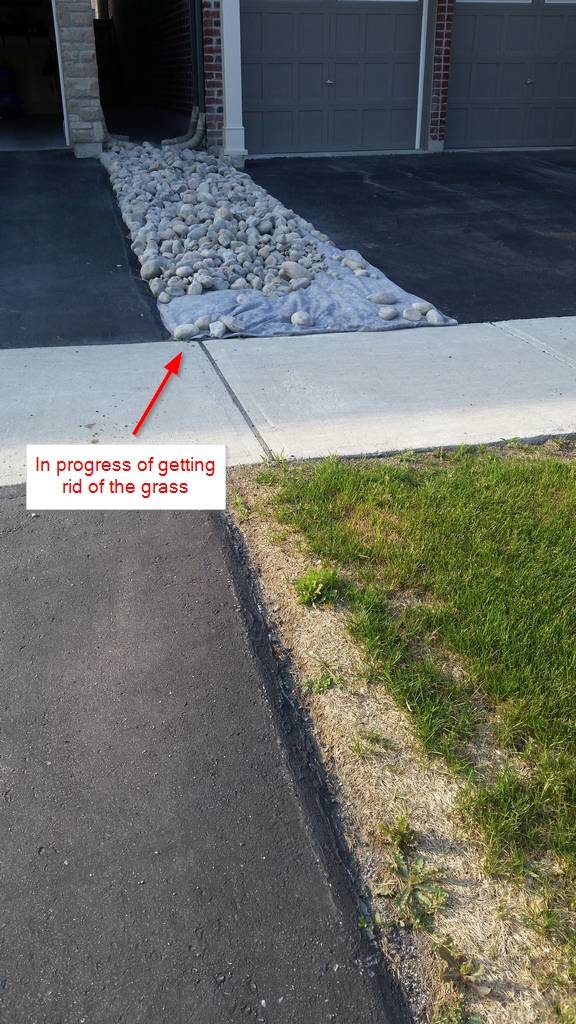
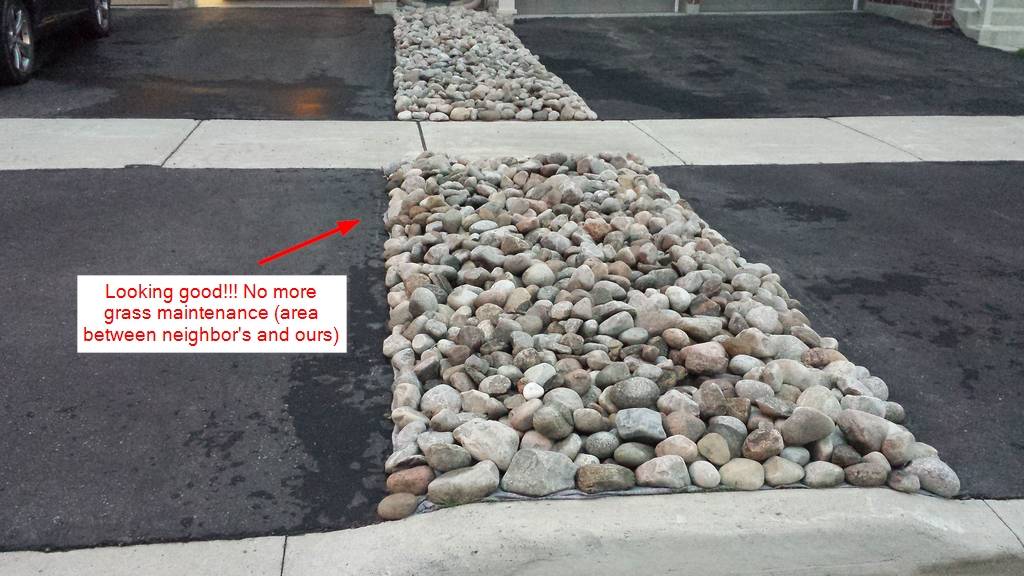
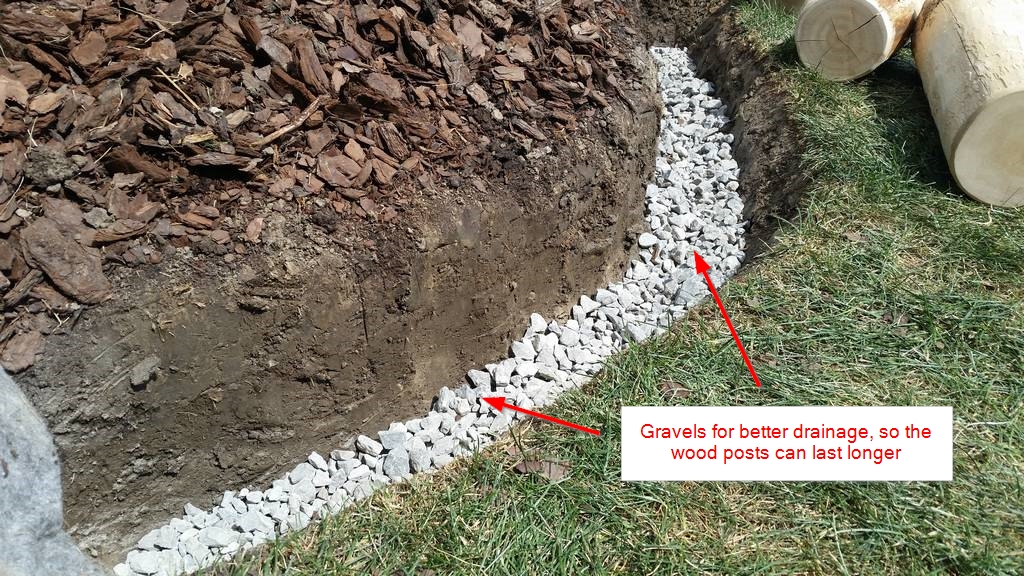
Grading Tips – Follow asphalt/concrete NOT soil
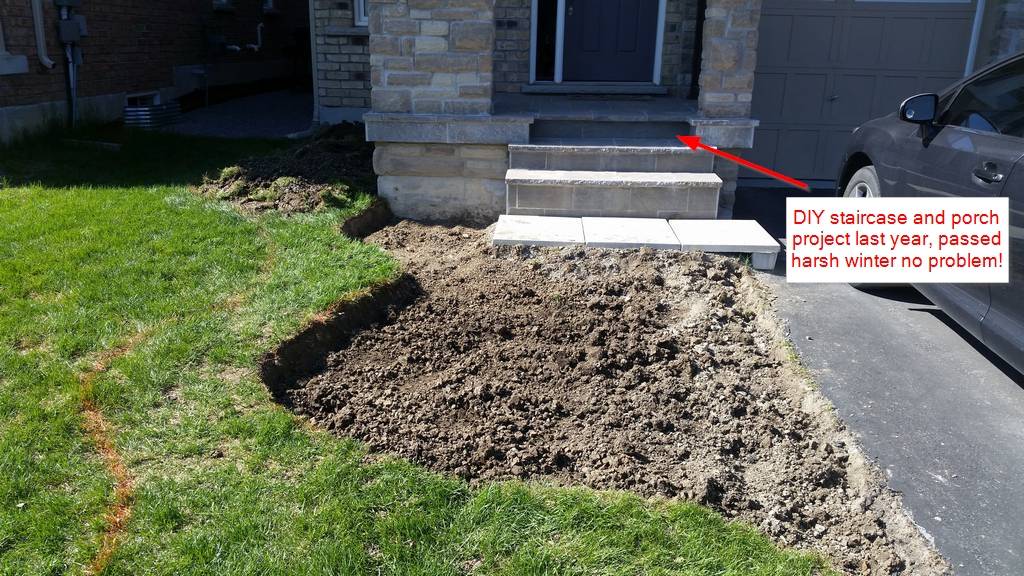
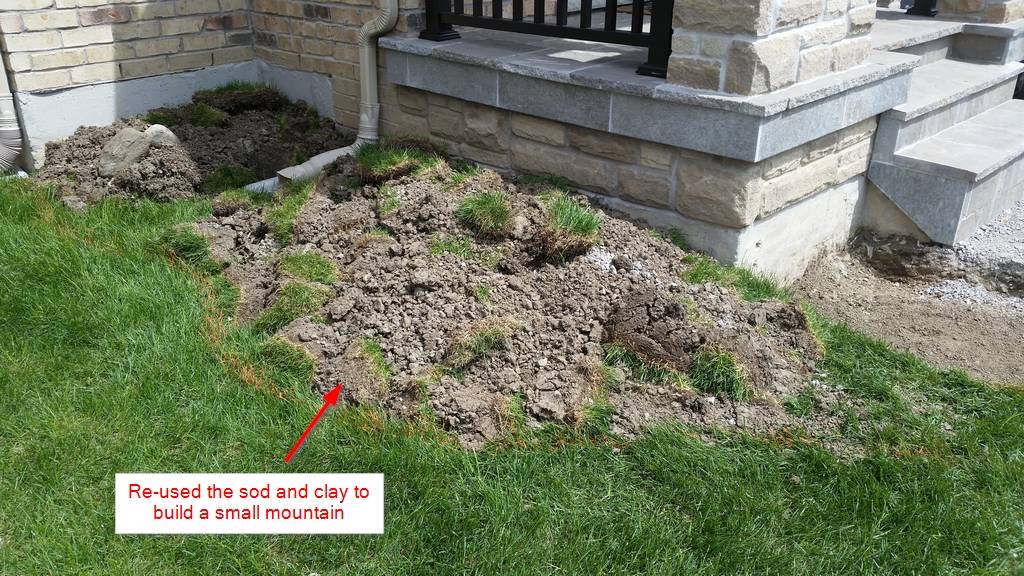
Noticed that I INTENTIONALLY DID NOT follow the height of the soil in front of the porch. Indeed, originally I did… but when I finished 30% I felt it was not right, it was way too steep. Since I was going to make a flower bed, it did not matter to me. In the worst case, you may have to build a step, wall or platform.
Three mistakes I made in this DIY project
- The first mistake I made was I ordered too much HPB, now I have 1.5 tons in my backyard, but it’s okay since I need to work on the backyard project next year
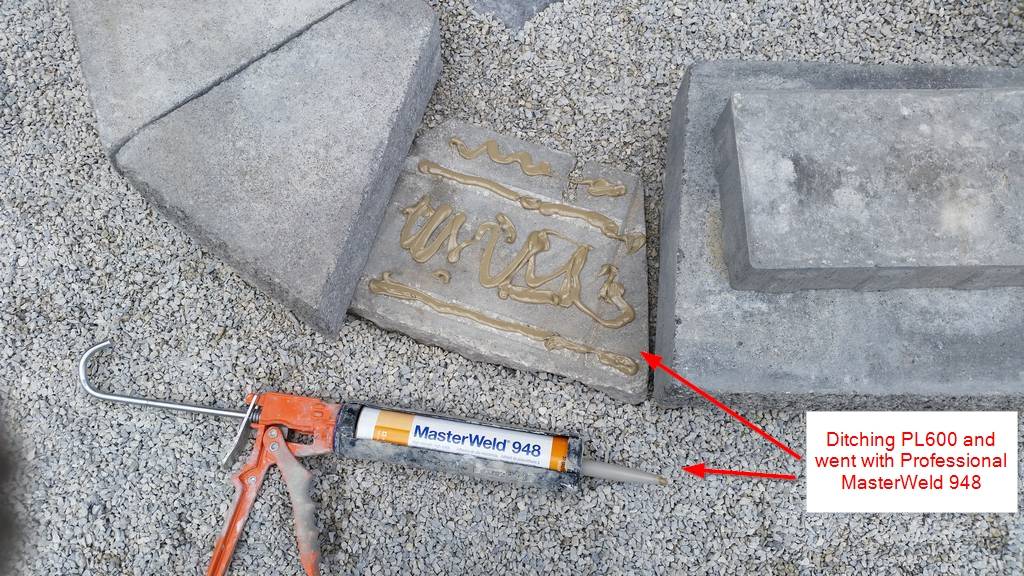
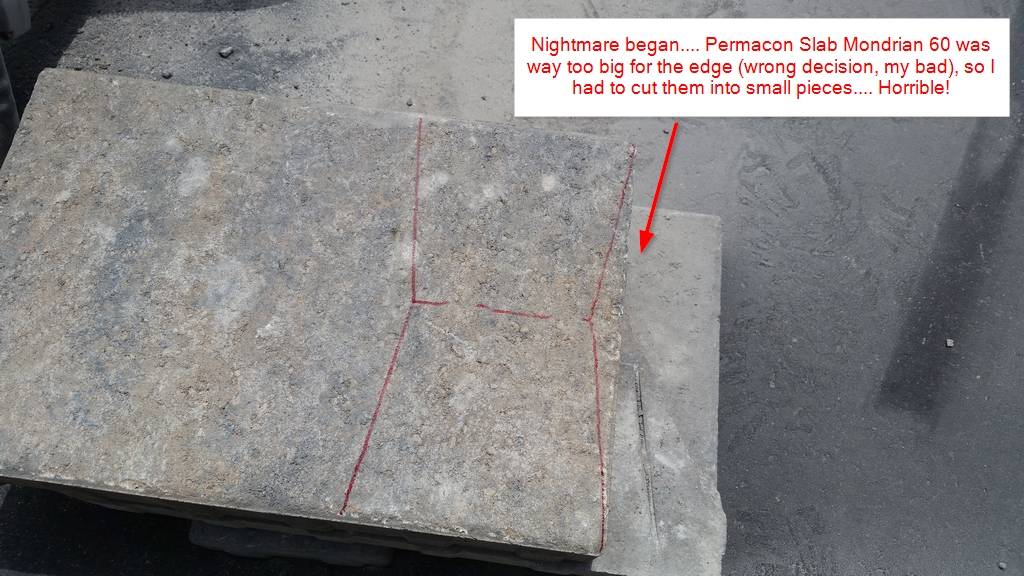
- The other mistake was to order the Permacon Slab Mondrian 60 Norvick Grey for the border, as you can see in one of the photos I had to cut them into smaller pieces. Yes, ALL the borders were manually cut from the bigger square or rectangular slabs, I have enough slabs to do another small patio area in backyard, seriously! It wasted a lot of time and effort but they looked awesome though
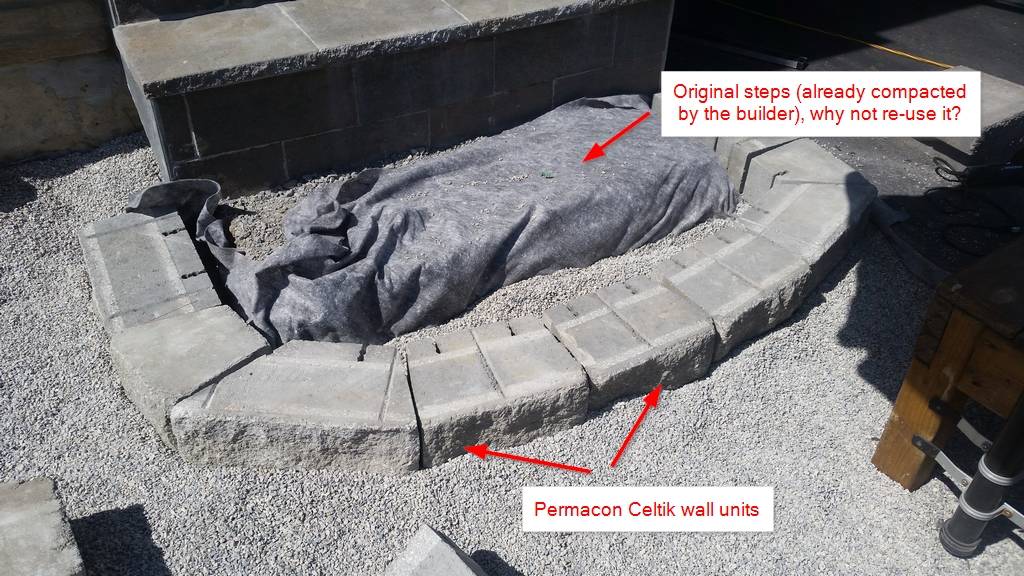
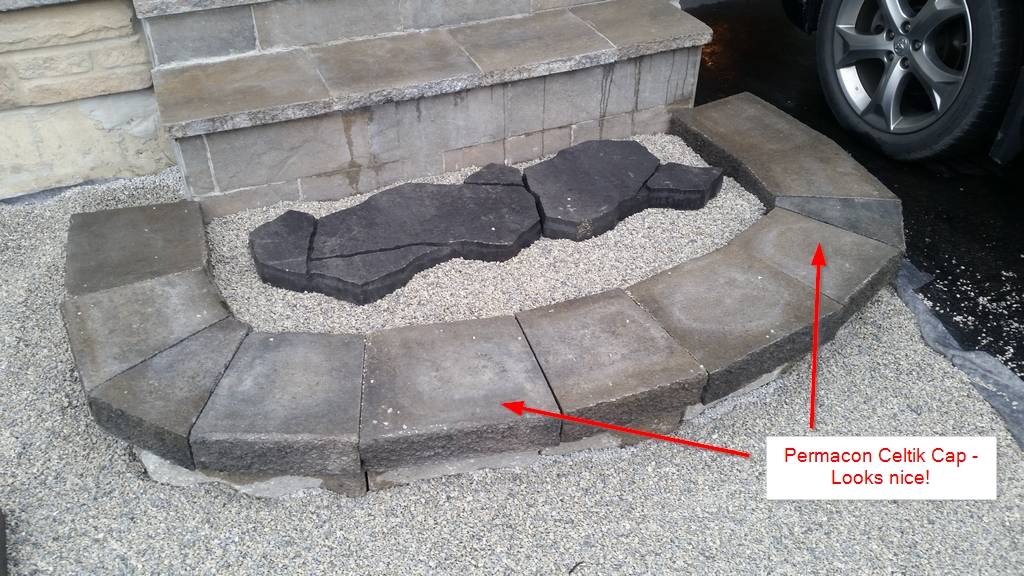
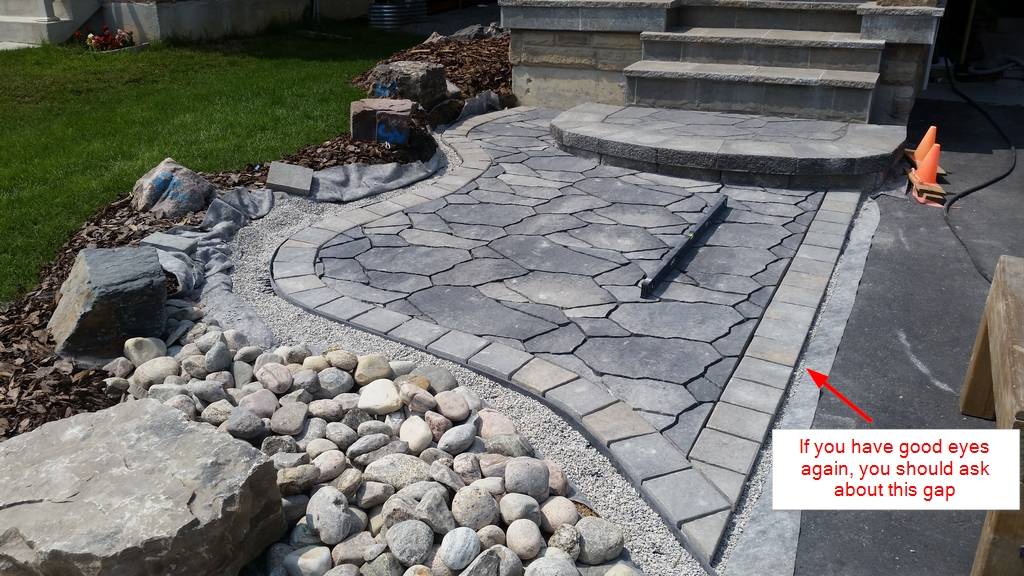
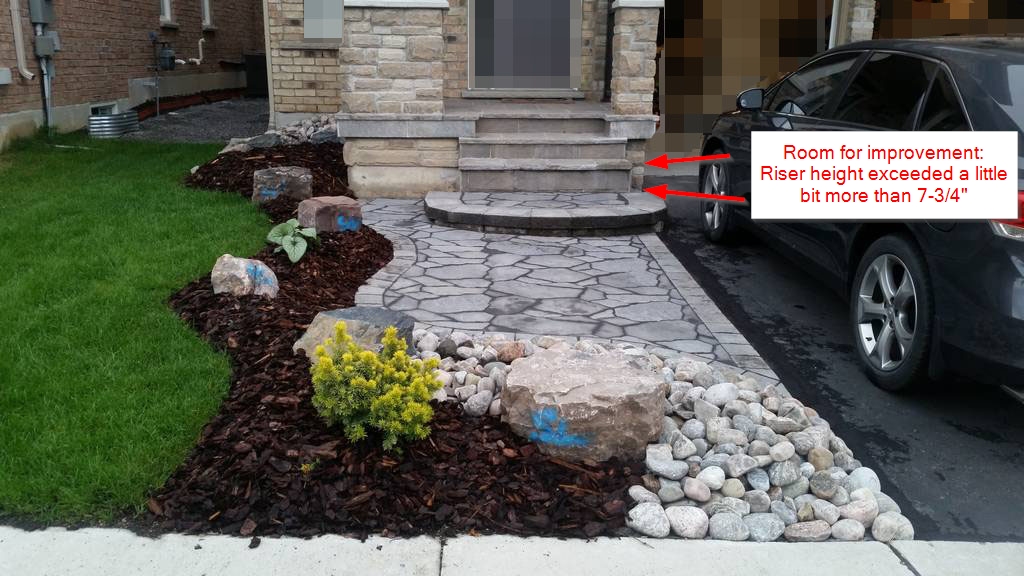
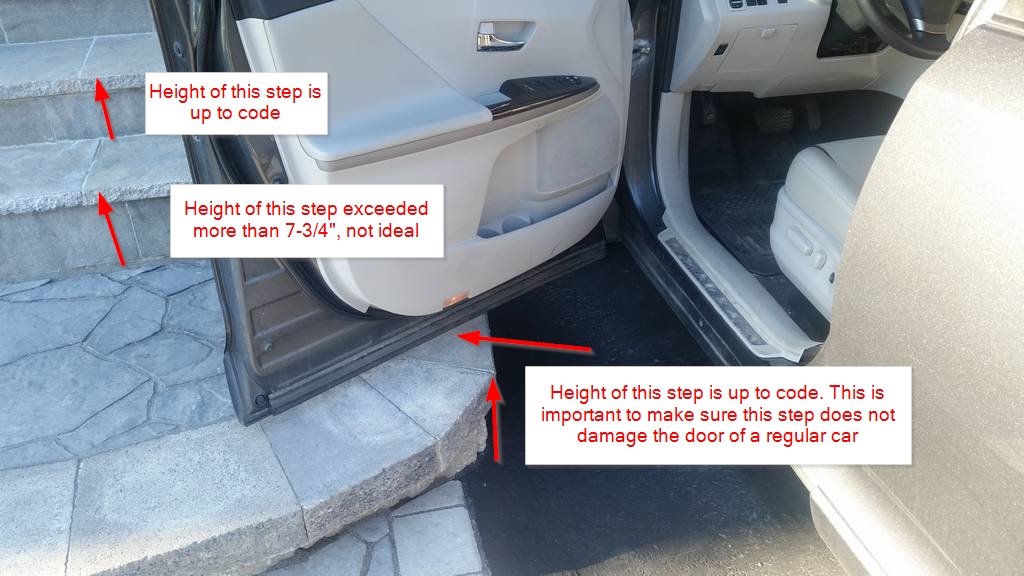
- The third mistake was the riser height on the last step on the porch meeting the platform exceeded 7 3/4″ (ideal maximum riser height), I made it a bit more due to various reasons. There was a technical challenge due to grading and the Permacon celtik wall unit I ordered was a bit short (5 5/16″). But if I were to order the 8 7/8″, the platform sitting on the Robel slabs will be too high. Maybe 2 steps platform were needed to solve this problem, honestly I am not sure. For existing steps, most adults would not even notice that until they bring small kids, adults would not trip because it was the last step of the porch and there is a big platform for landing.
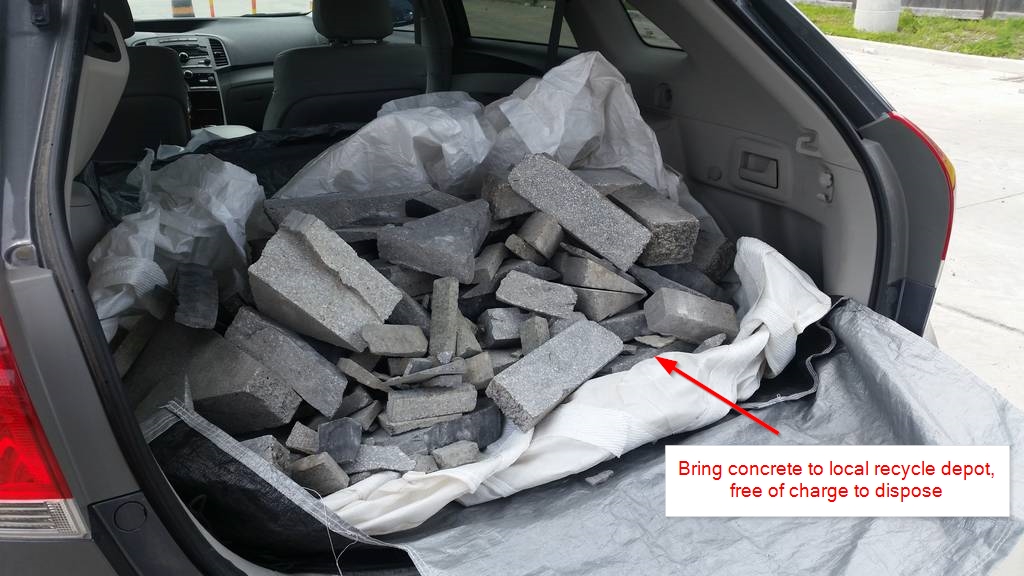
Cost Break Down for Excavation = $424 CAD (tax included)
- Bagster bags x 2 = $80
- Baster pick up = $344
Cost Break Down for Walkway = $2804 CAD (tax included)
- 1.5 Tons HPB (2 bags) + 1 ton HPB (1 bag) = 4 tons (8000 lb) = $202
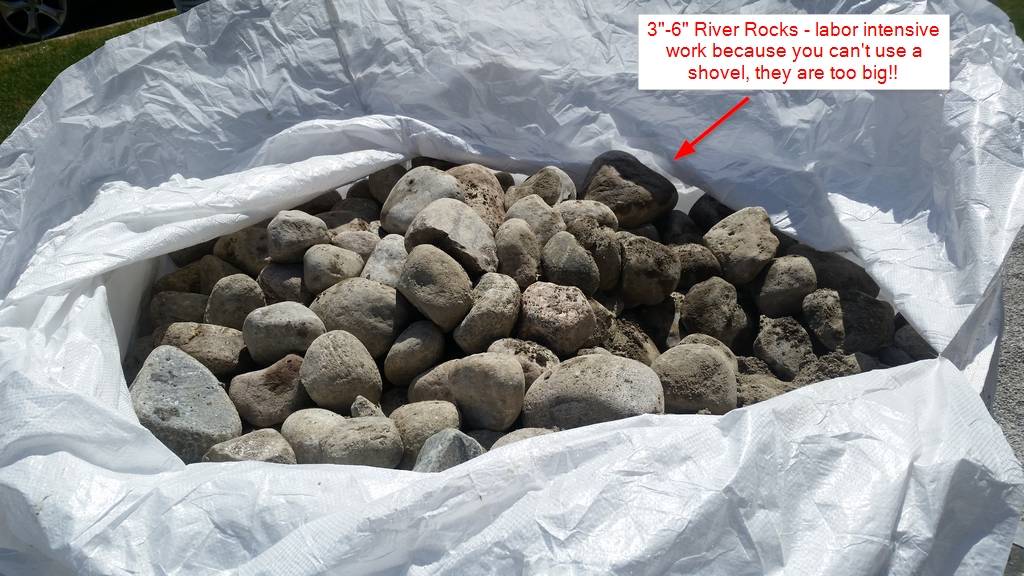
- 1.5 Tons 3″-6″ Pebble (x 3 mega bags) = 4.5 tons (9000 lb) = $466
- Permacon Rosebel Newport Grey 95 sq.ft = $551
- Permacon Slab Mondrian 60 Norvick Grey 126 sq. ft = $224
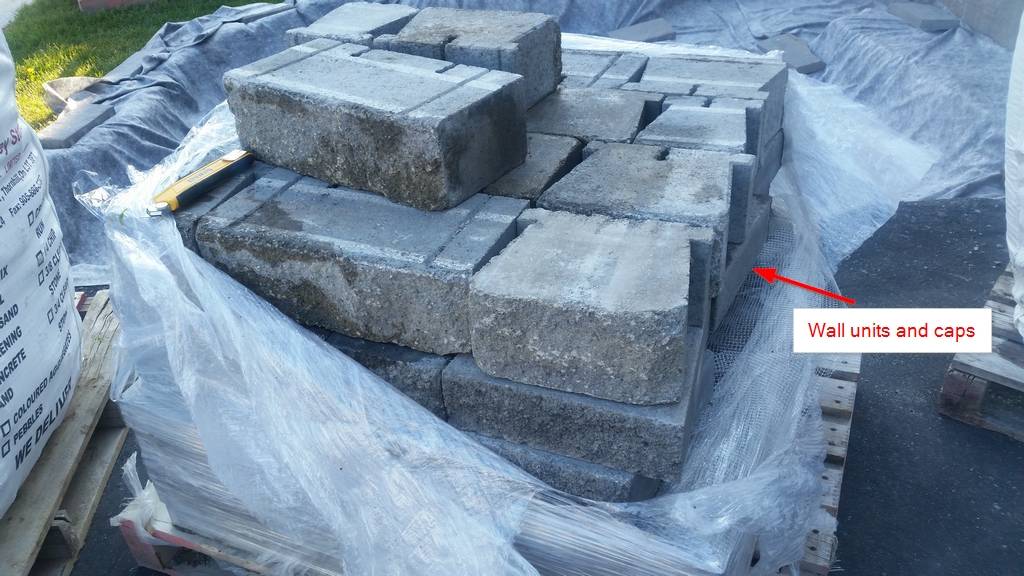
- Permacon Celtik Cap Bev Norvick Grey 65 sq.ft = $146
- Permacon Celtik 135mm Norvick Grey Wall Unit 35 sq.ft. = $124
- Permacon PolySand SP Grey x bags = $51
- Mega Bags = $140
- Rock/Boulders = $196
- Landscaping Adhesive = $12
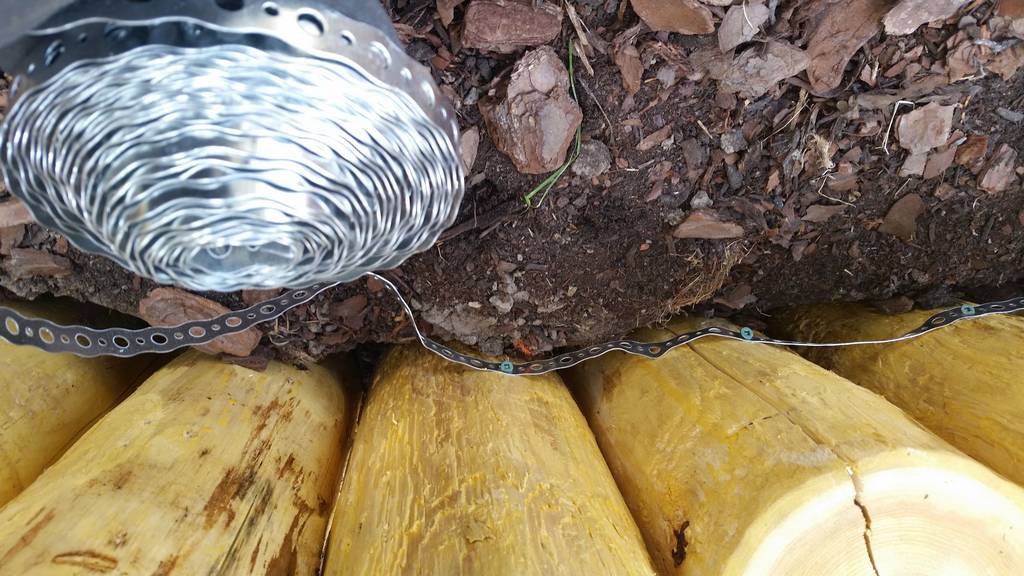
- Plastic edge and 10″ spikes $= 60
- GeoTexile landscape fabric = $80
- Concrete saw rental and misc tools = $150
- Skid, Pallet, Delivery and Tax = $402
Cost break down for Garden = $588 CAD (tax included)
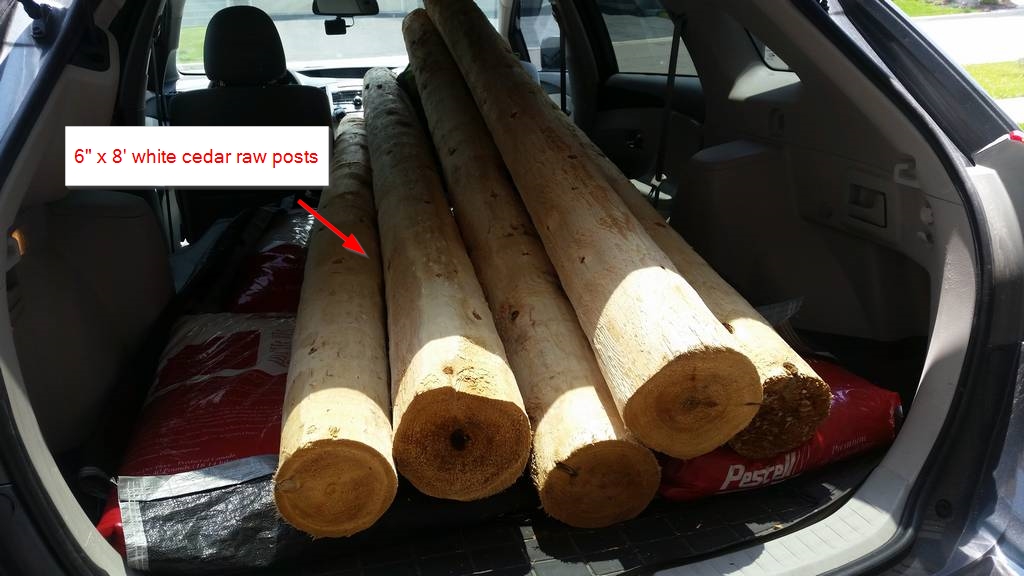
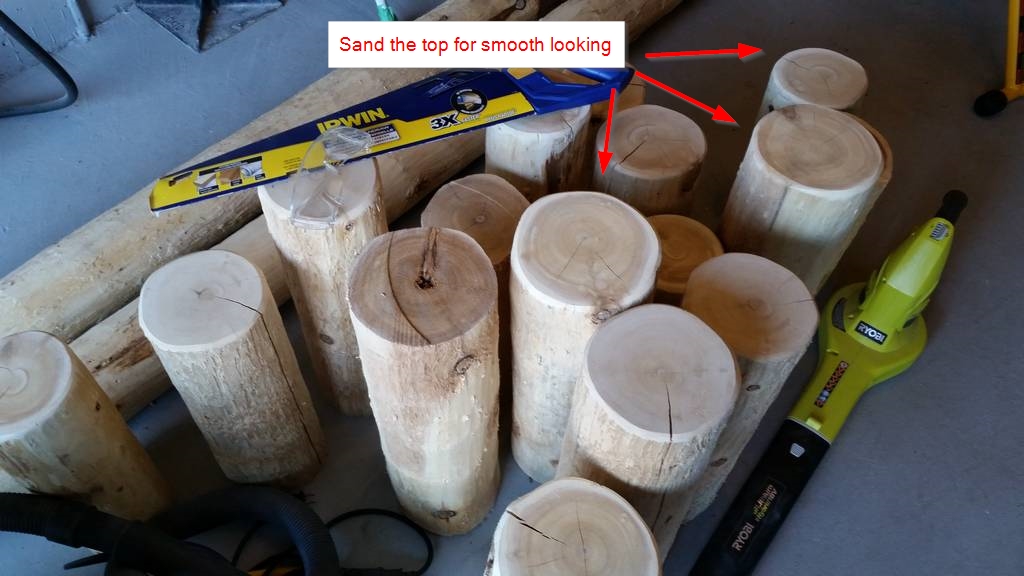
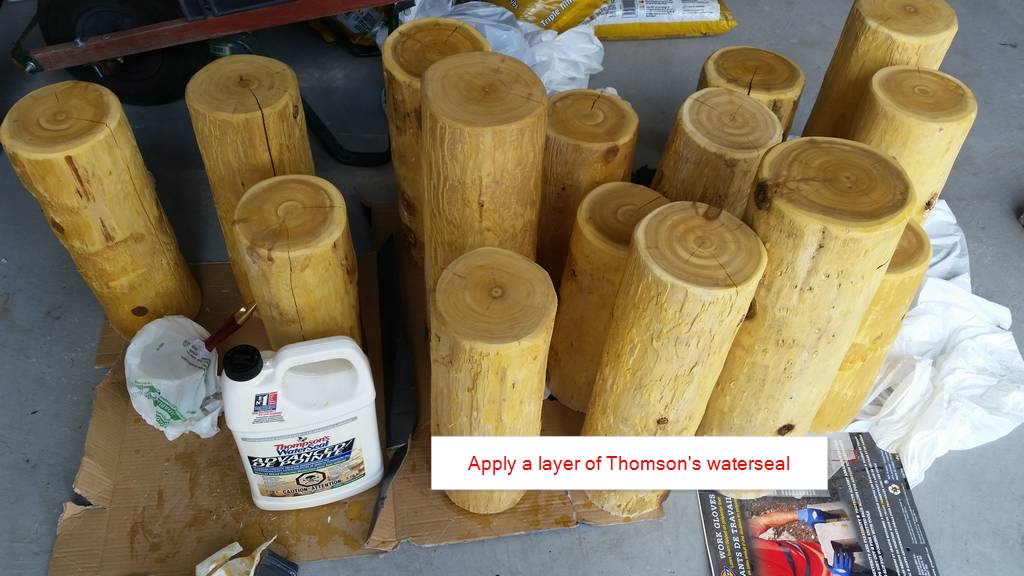
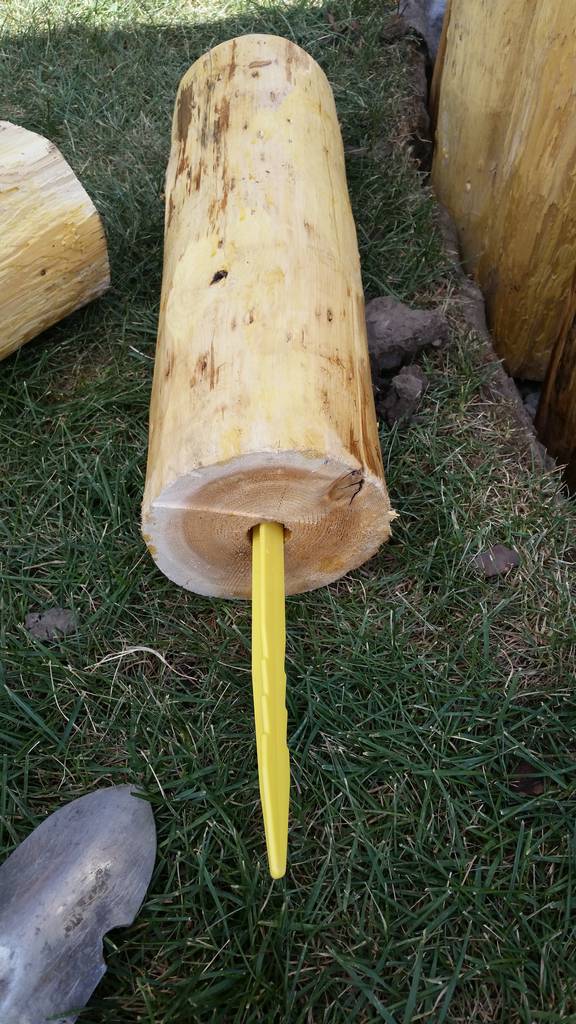
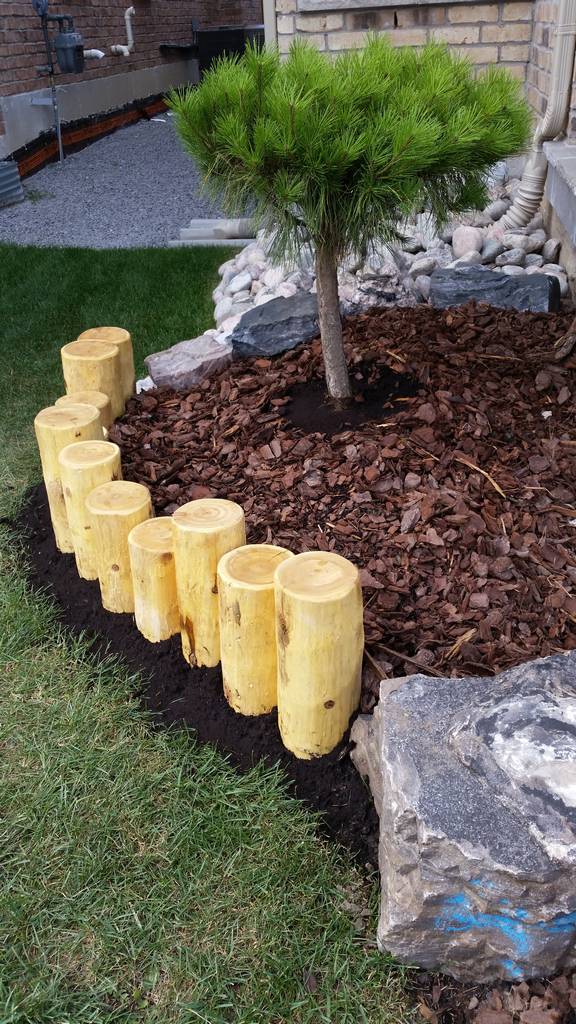
- 6″ x 8′ white cedar post (x 5) = $68
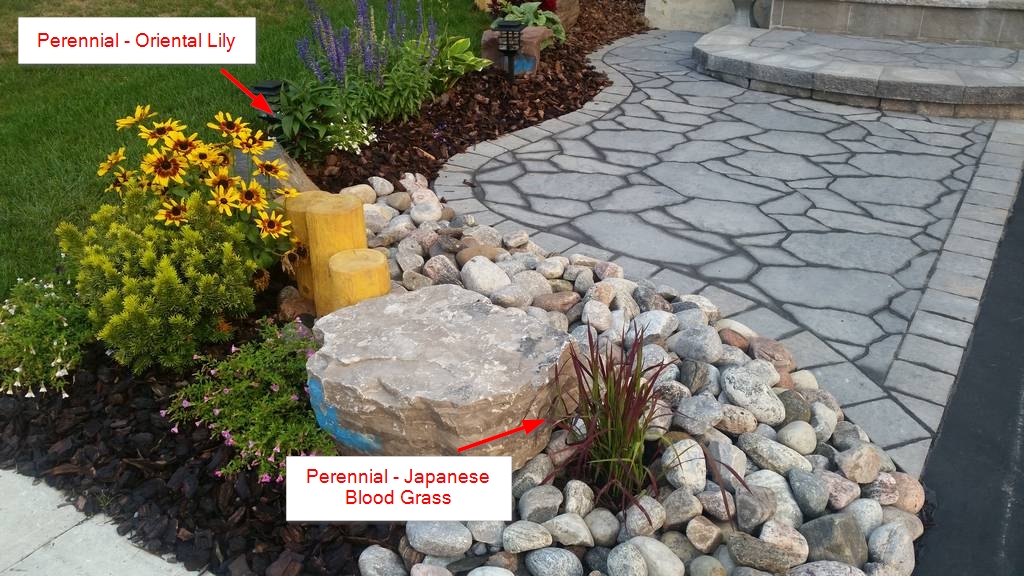
- Annuals and Perennials (Sheridan, Costco, Humber Nurseries, HD, Rona) = $350
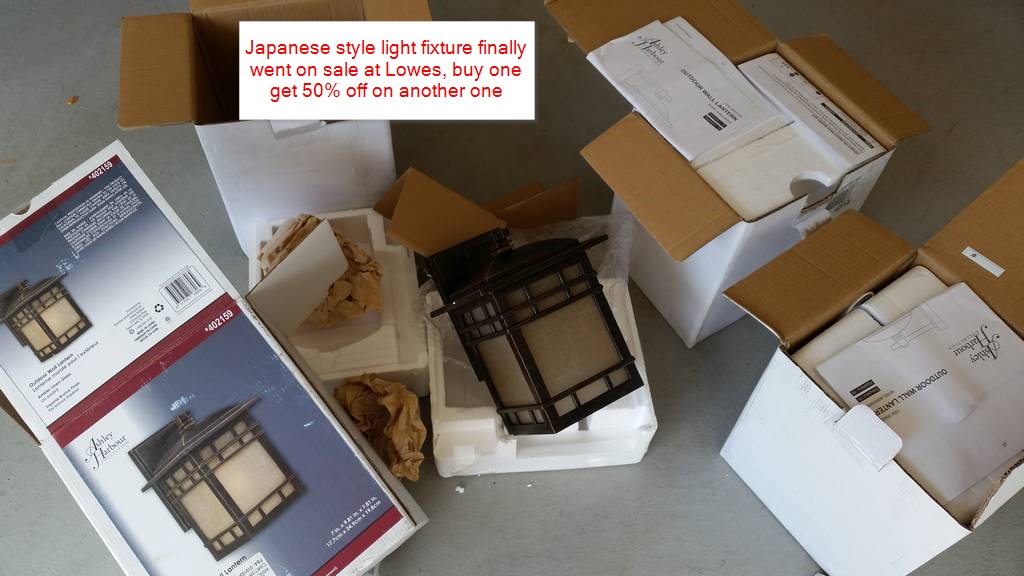
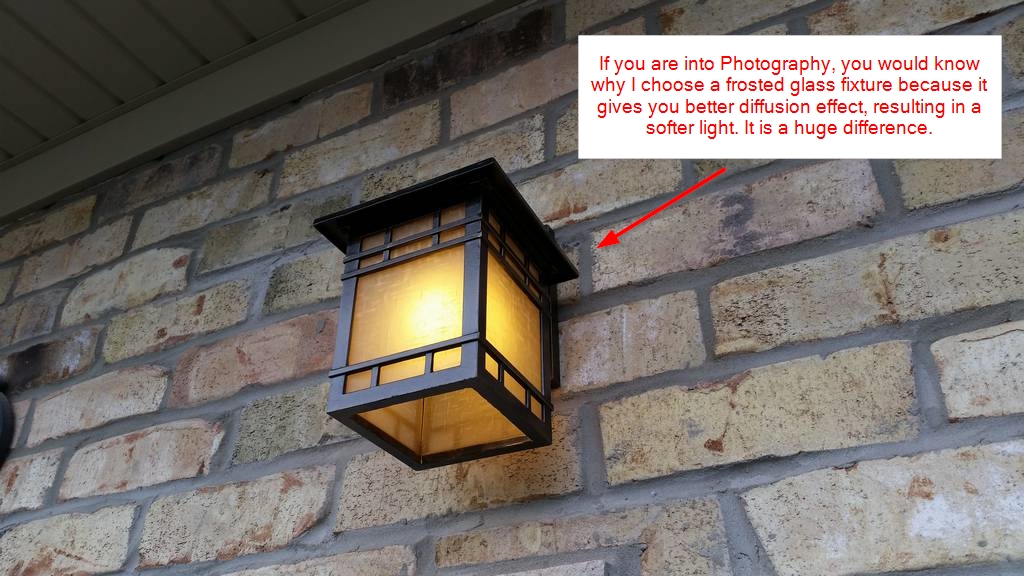
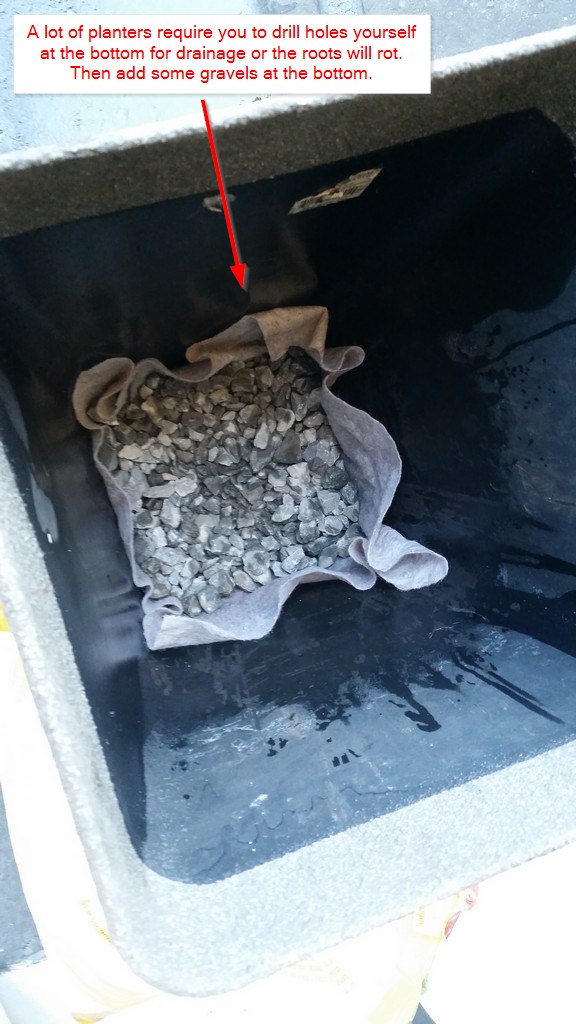
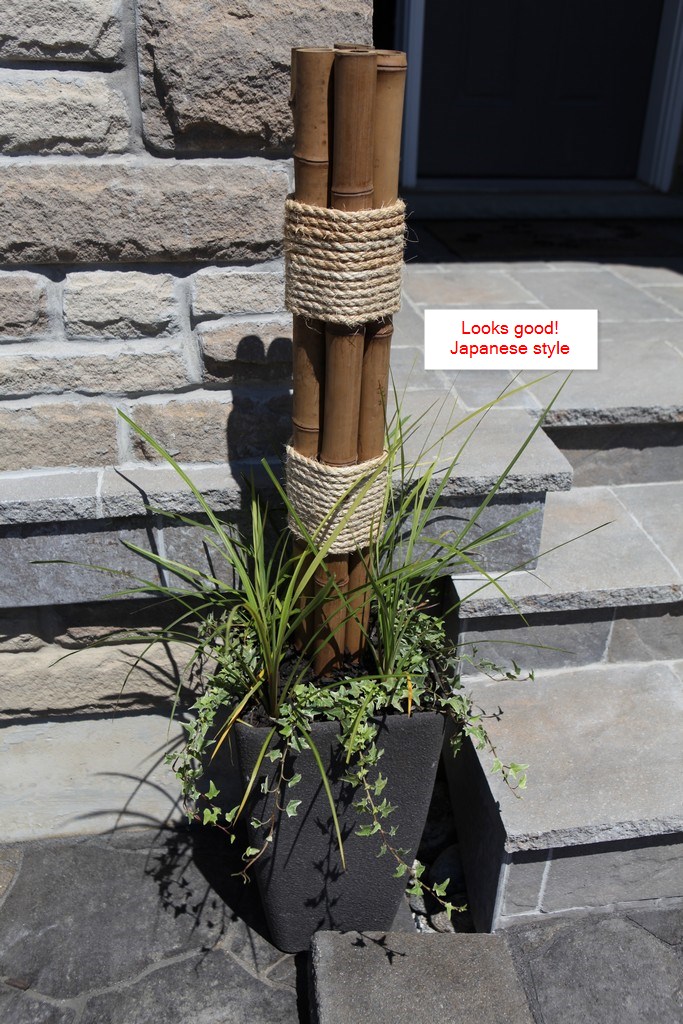
- ANGELO DÉCOR Plastic Japanese style Lantern Pagoda Statue (Home Depot) = $50
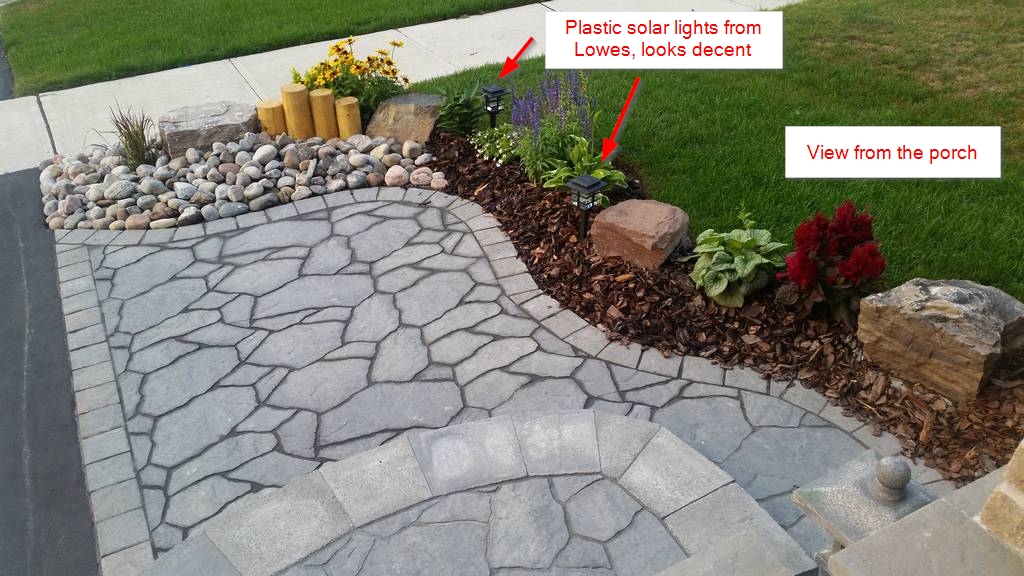
- Solar LED plastic lights pack of 4 (Lowes) = $40
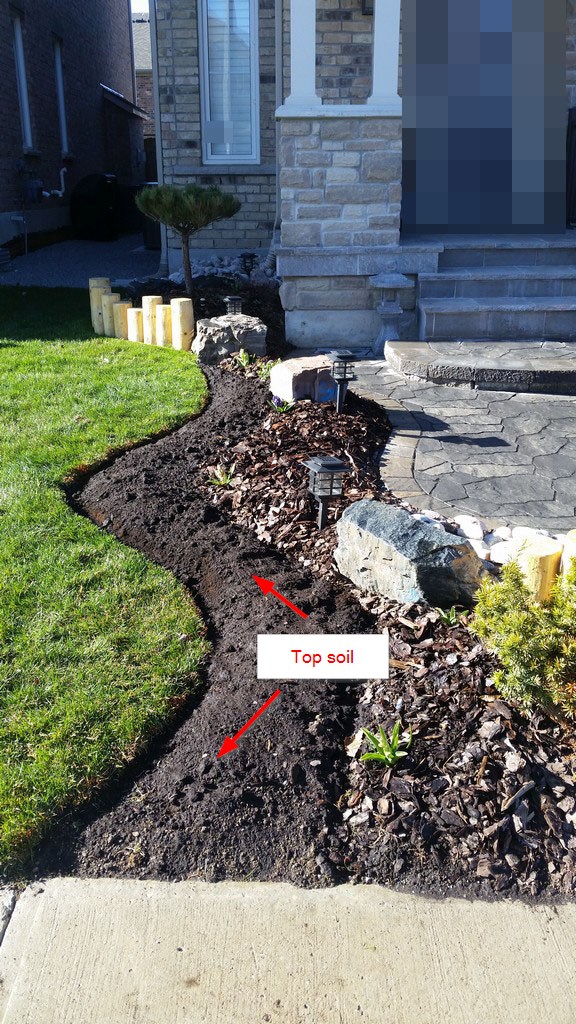
- Top soil and tree barks = $80
The whole project was around less than $4K excluding labor (DIY). Note that there are 1.5 tons HPB and around 60 sq. feet of Mondrian 60 leftover (read the 2 mistakes section), so the cost can probably come down if I didn’t make the mistakes.
Conclusion
Level of difficulty: 4.5/5
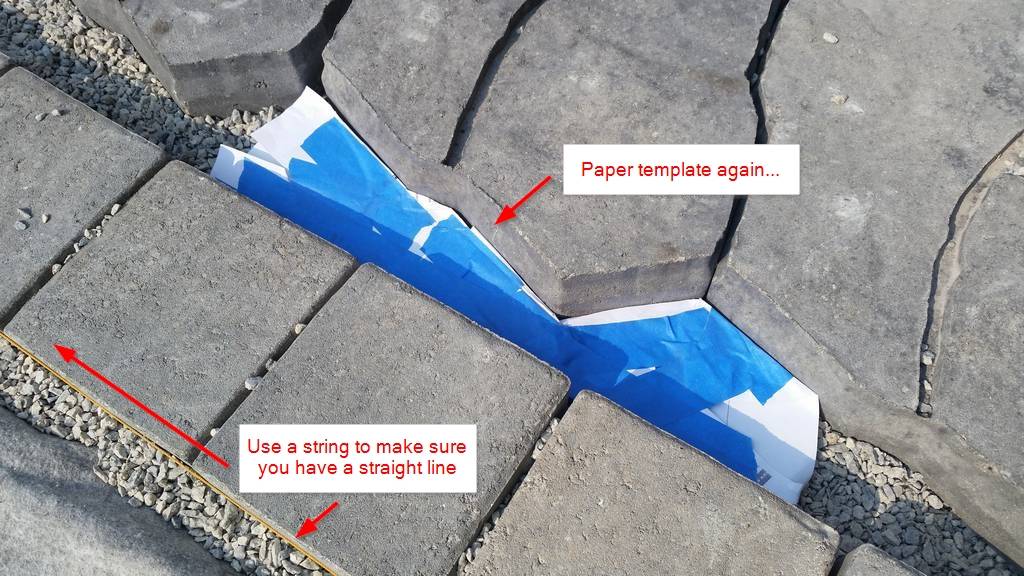
If it were smaller pavers or slabs, it would be much easier. Each Rosebel slab is weighted at around 50 lb, they are so heavy and large in size 30″ x 15″ x 2 3/8″ and 22″ x 15″ x 2 3/8″. It took 50% more effort to move, measure and cut precisely compared to the small traditional pavers. Due to its irregular shape on my curve design, it took another additional 30% of time just to think, measure and making paper templates. Of course, it can be DIY as I have successfully pulled it off alone. It looks so beautiful, I hope this helps other people who want to DIY. It’s not easy but it’s doable and it is worth the effort.
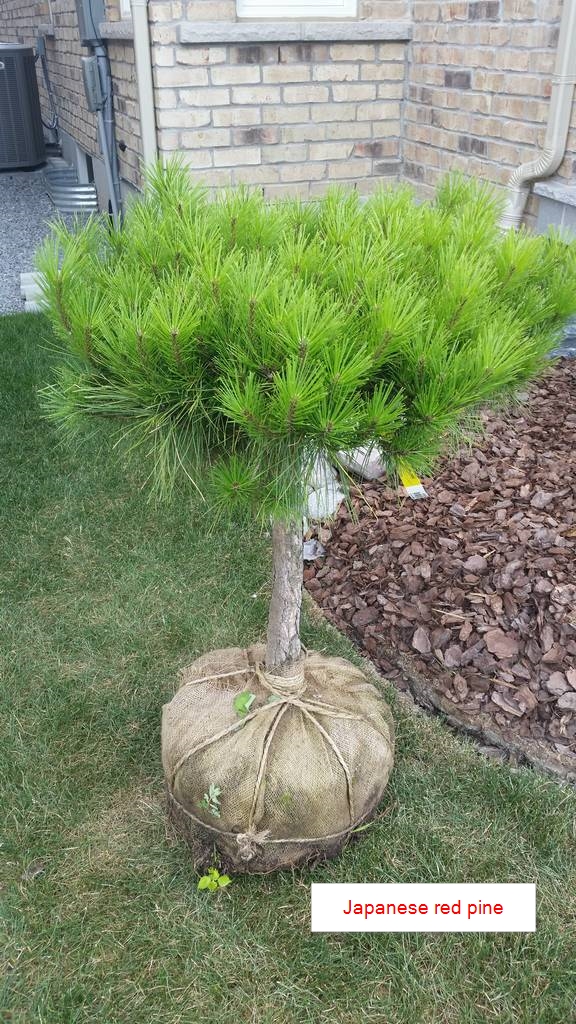
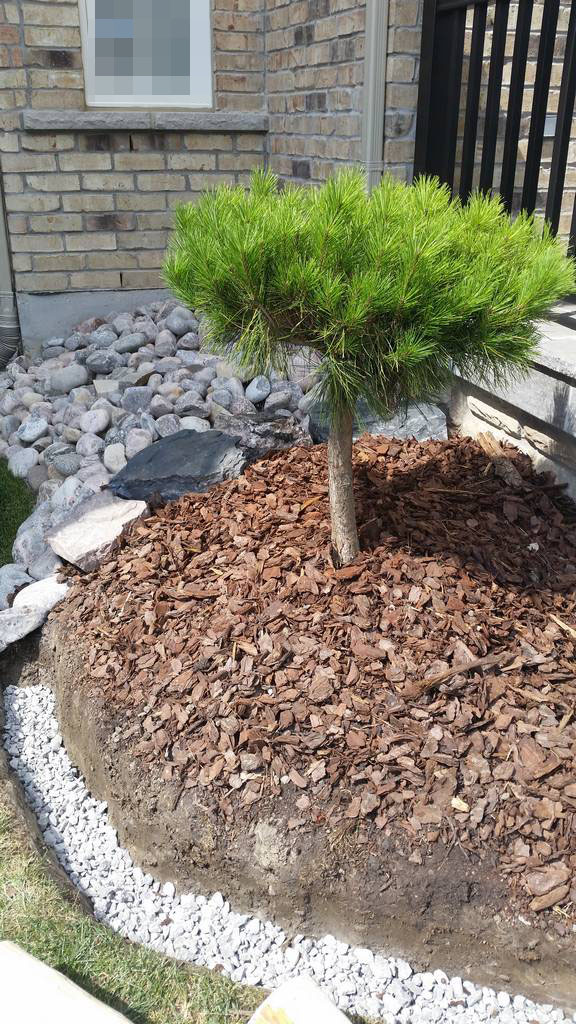
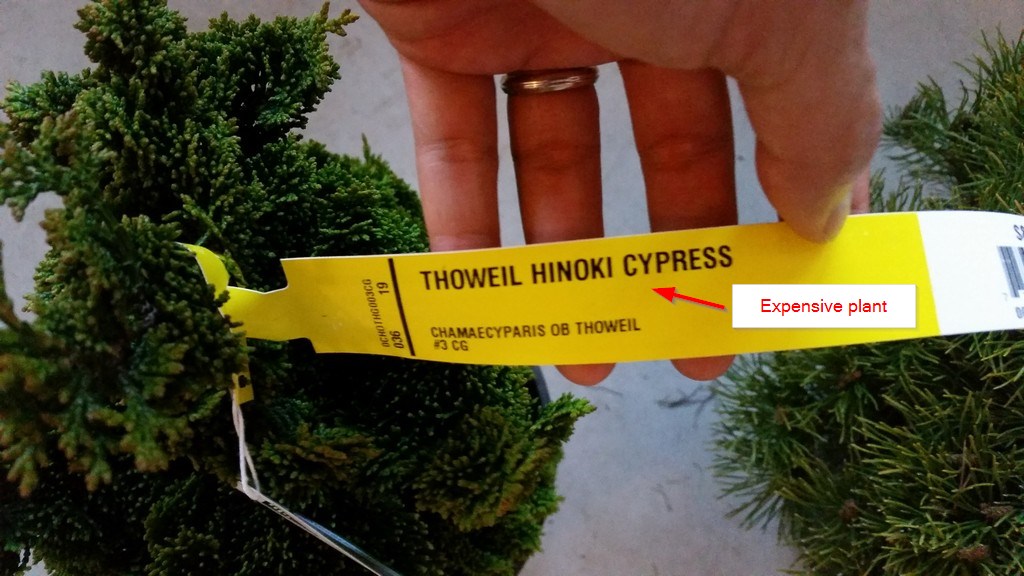
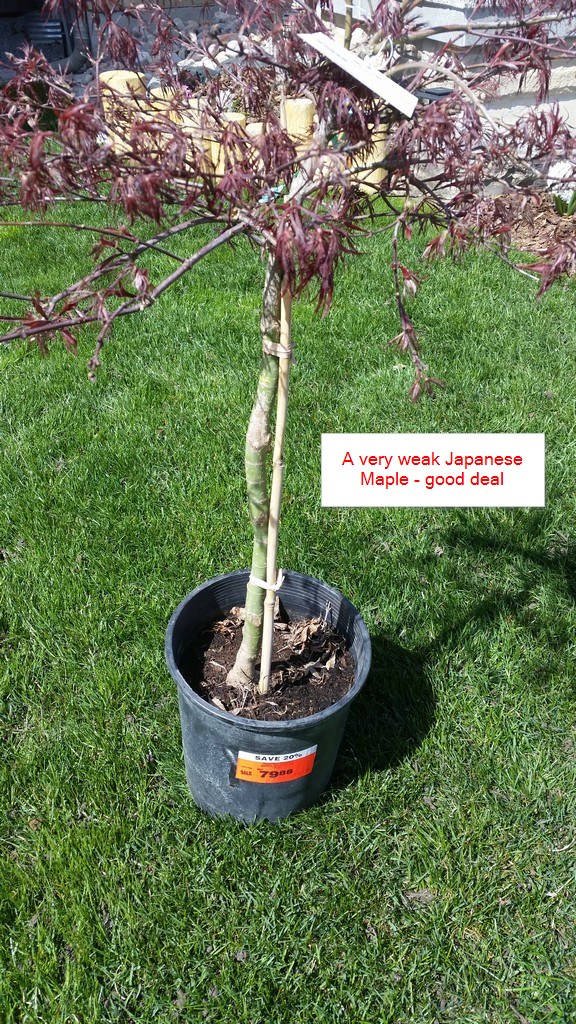
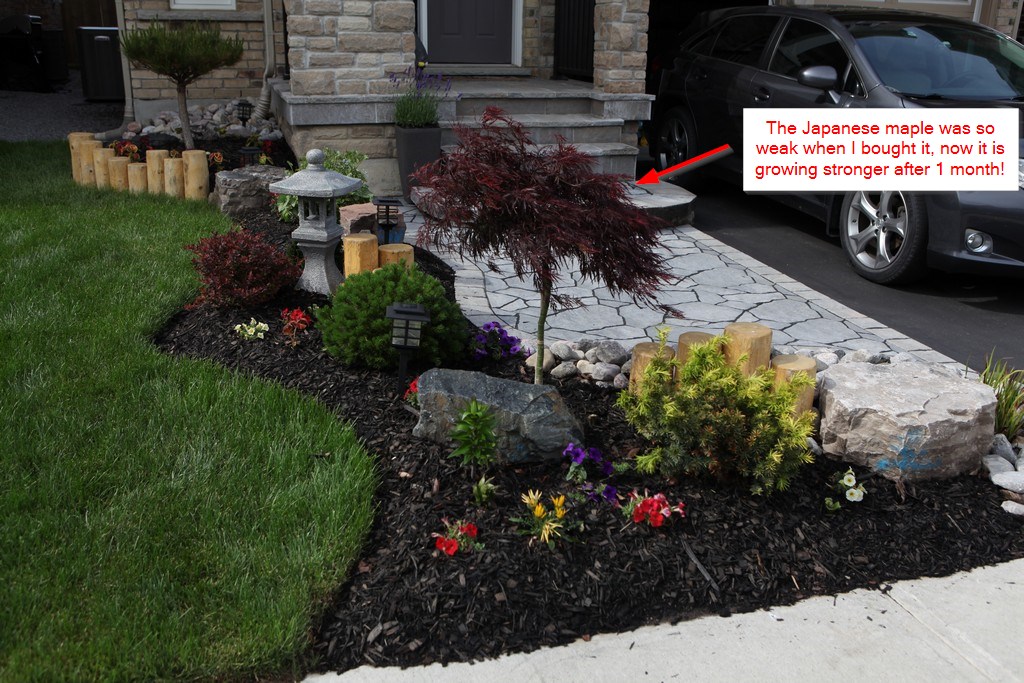
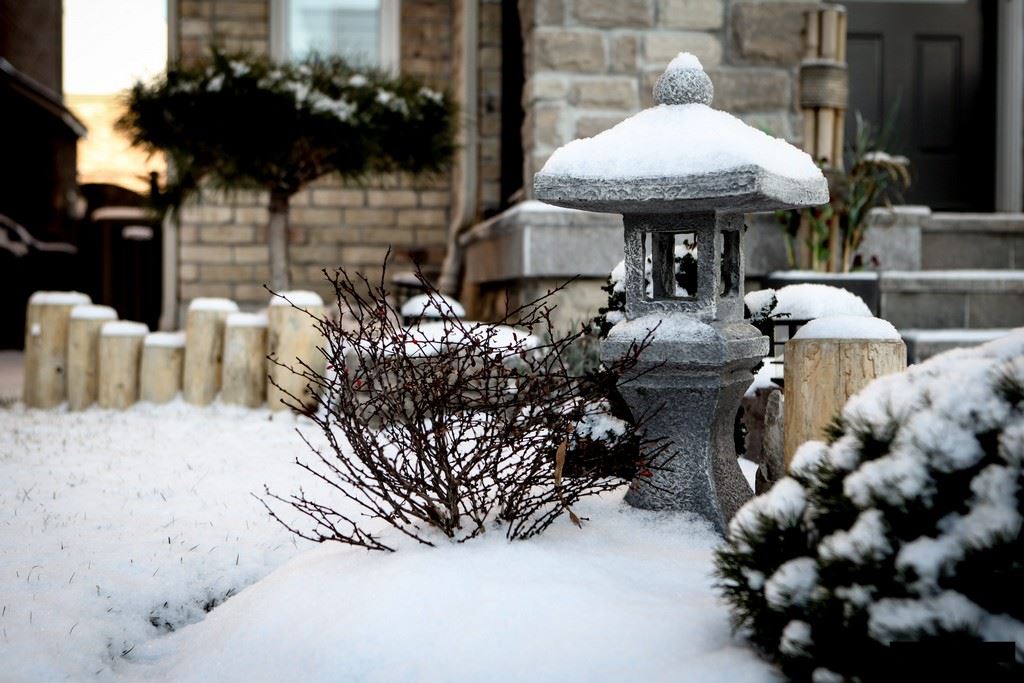
The plants indeed look a bit small but in 3-5 years, they will become pretty big. At least the Japanese pine will be 6 feet tall I will keep this blog updated.
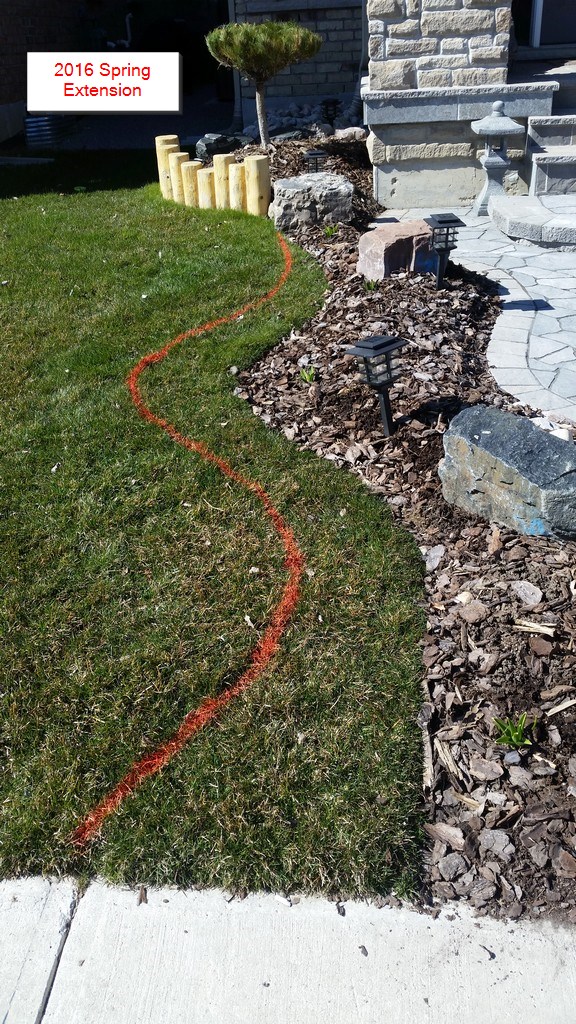
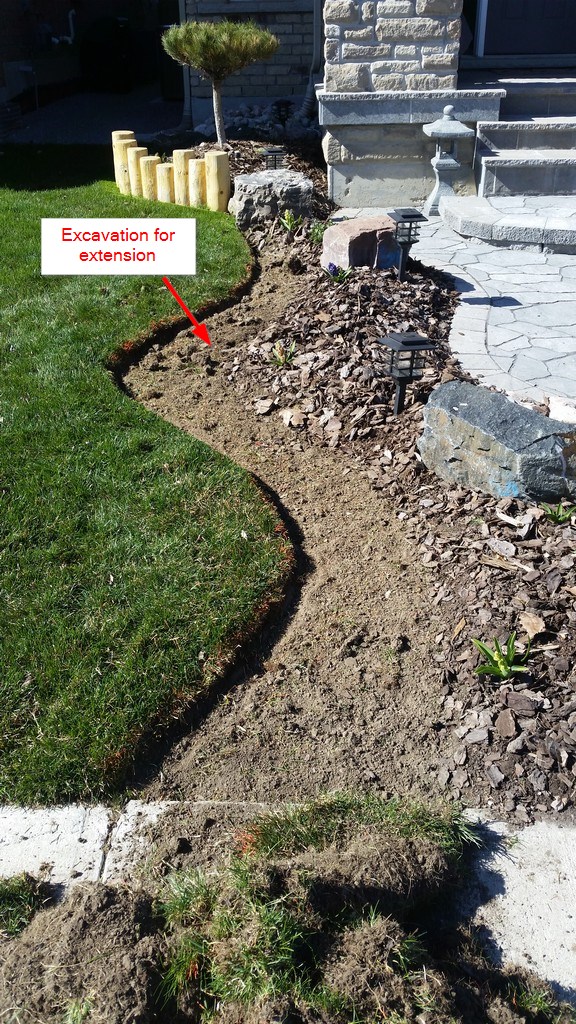
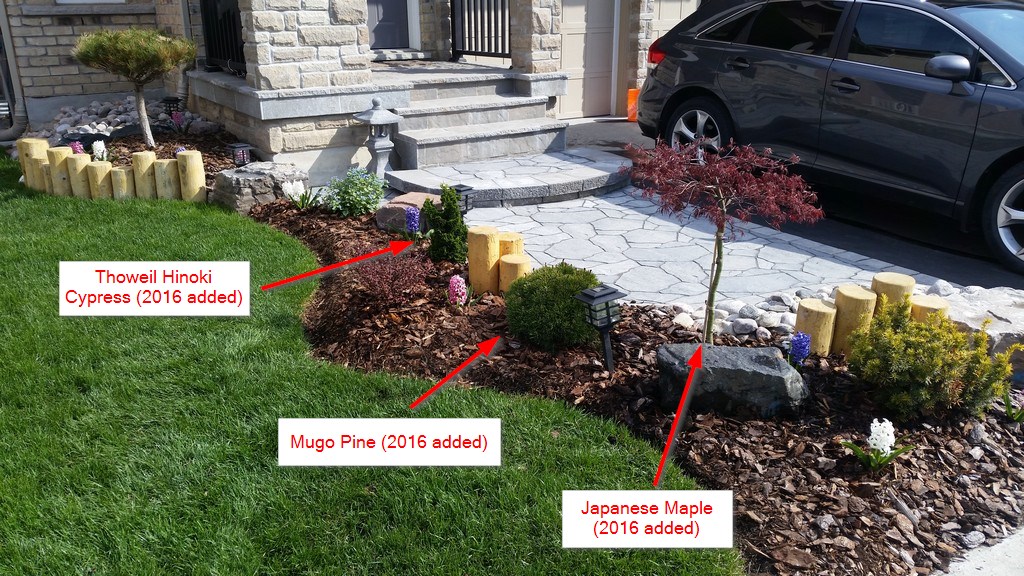
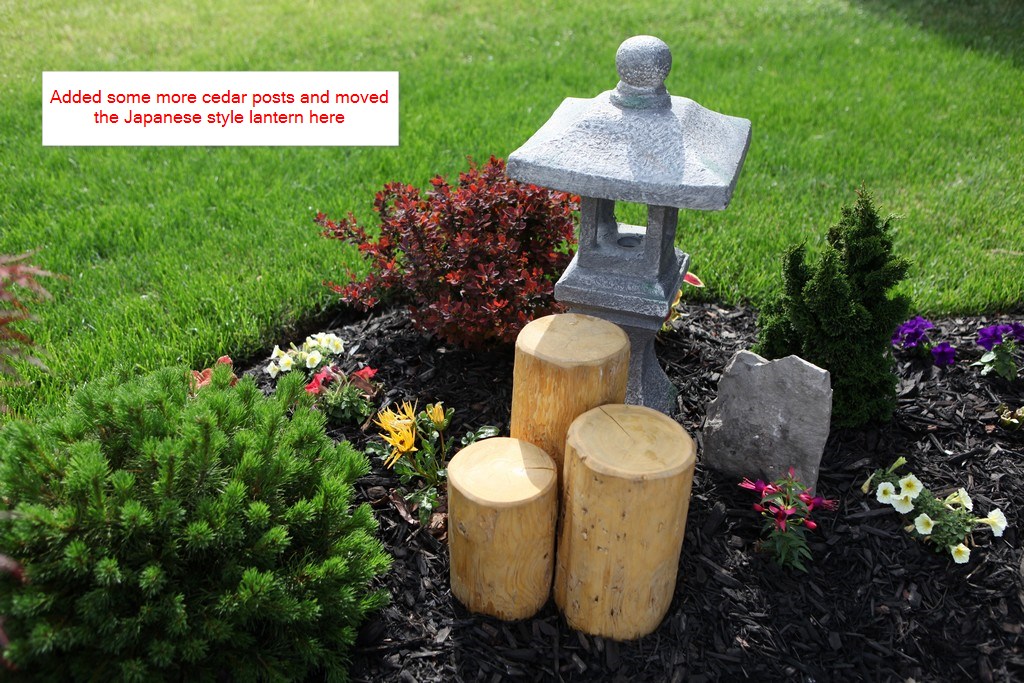
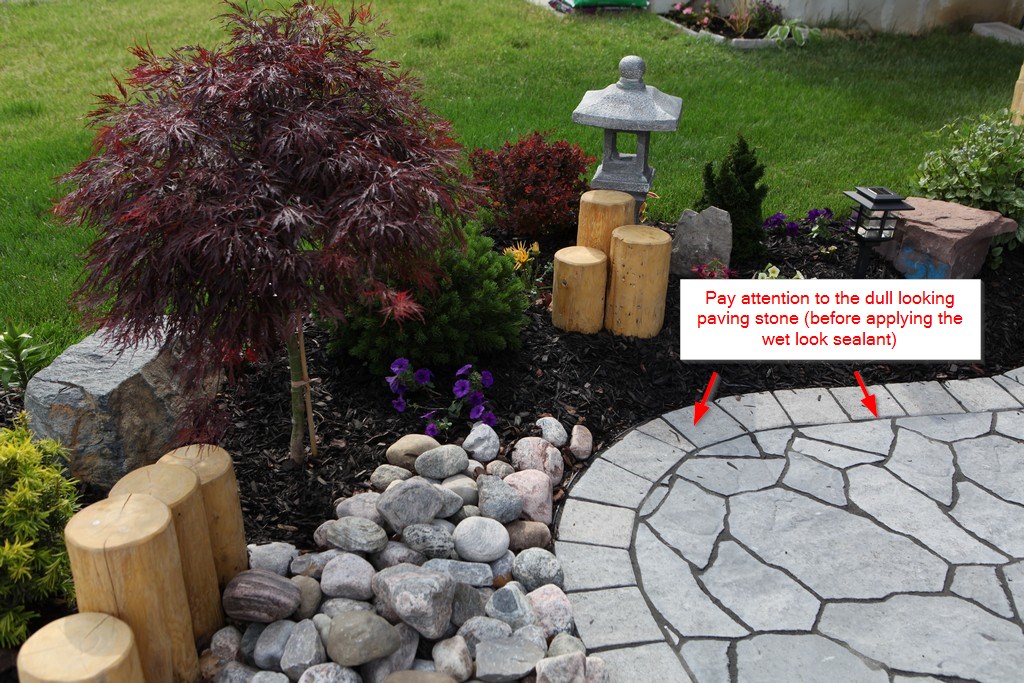
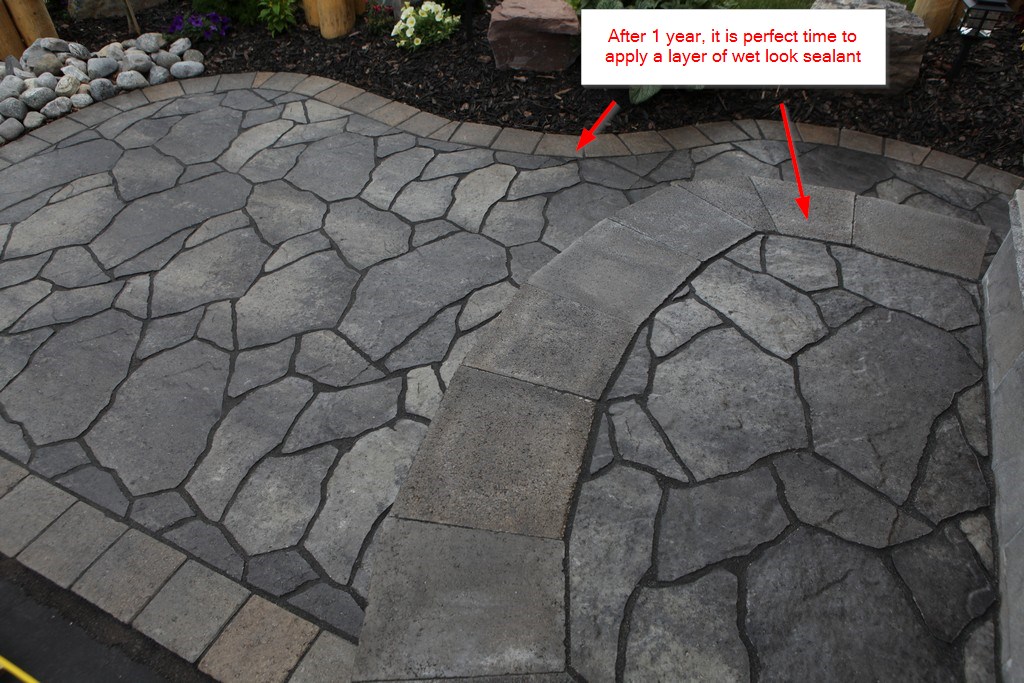
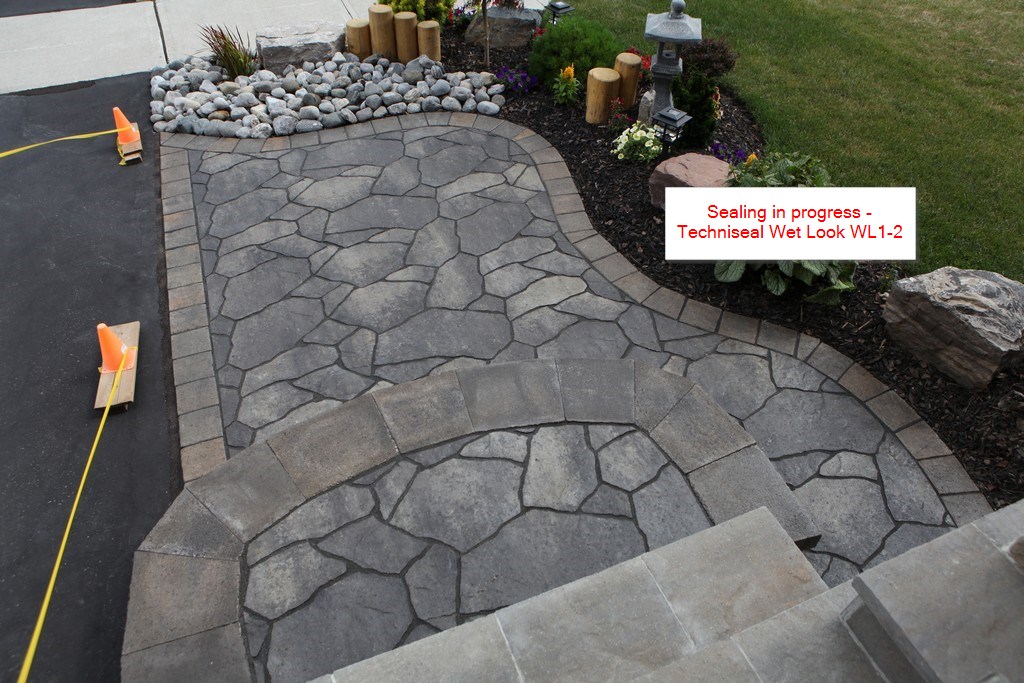
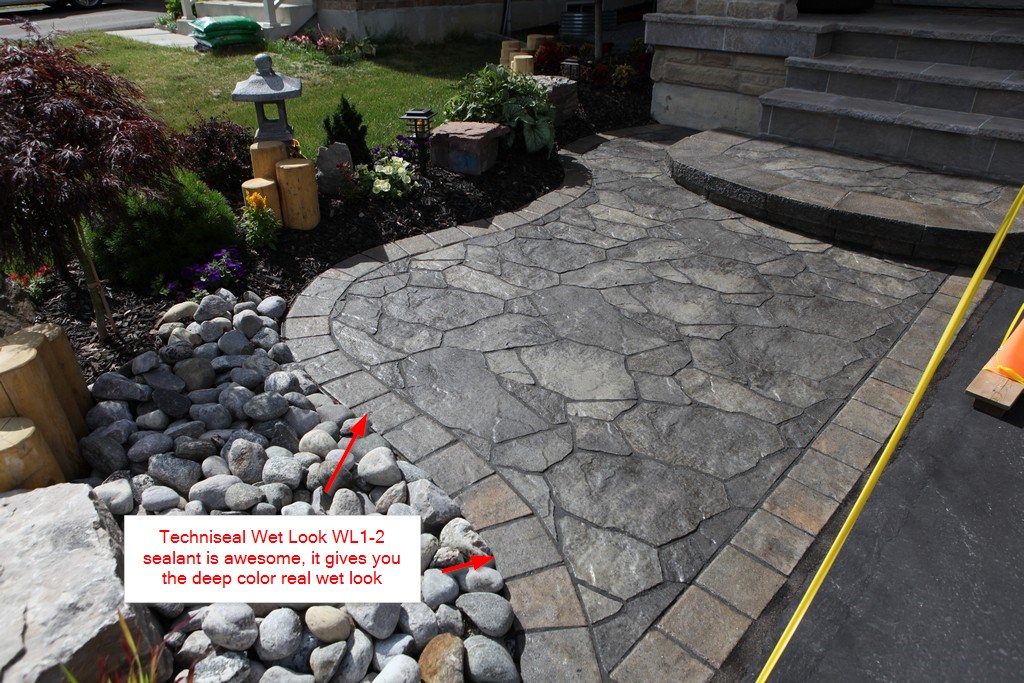
Update (2016 Spring and Summer)
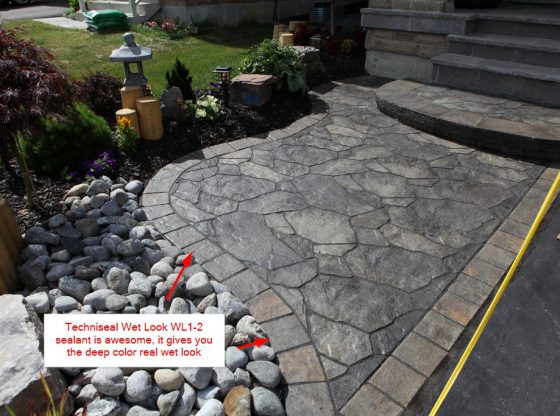
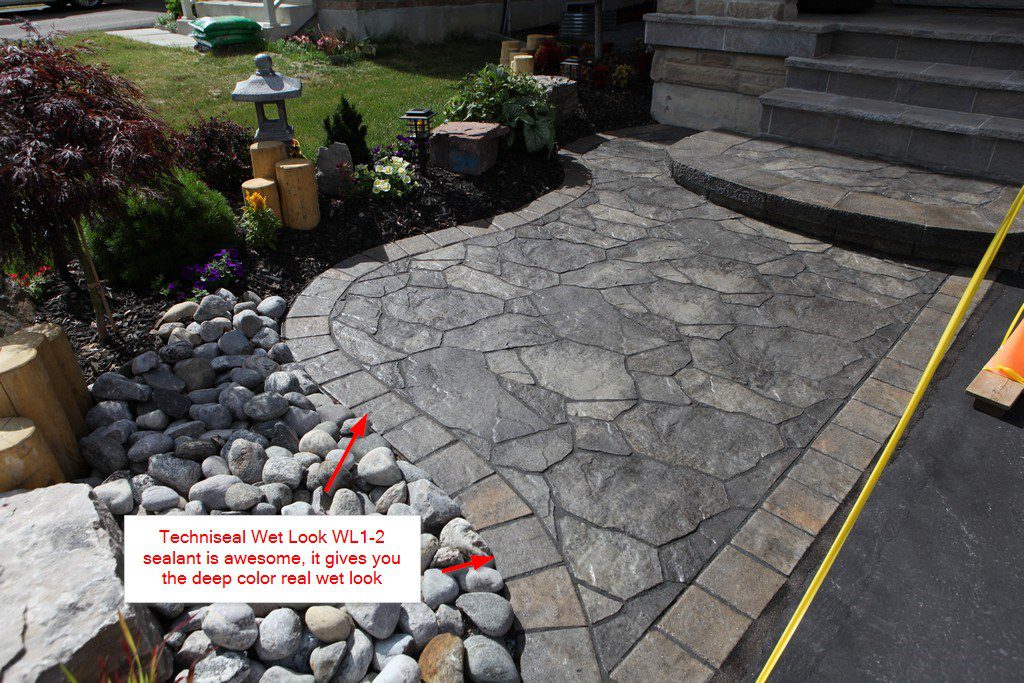
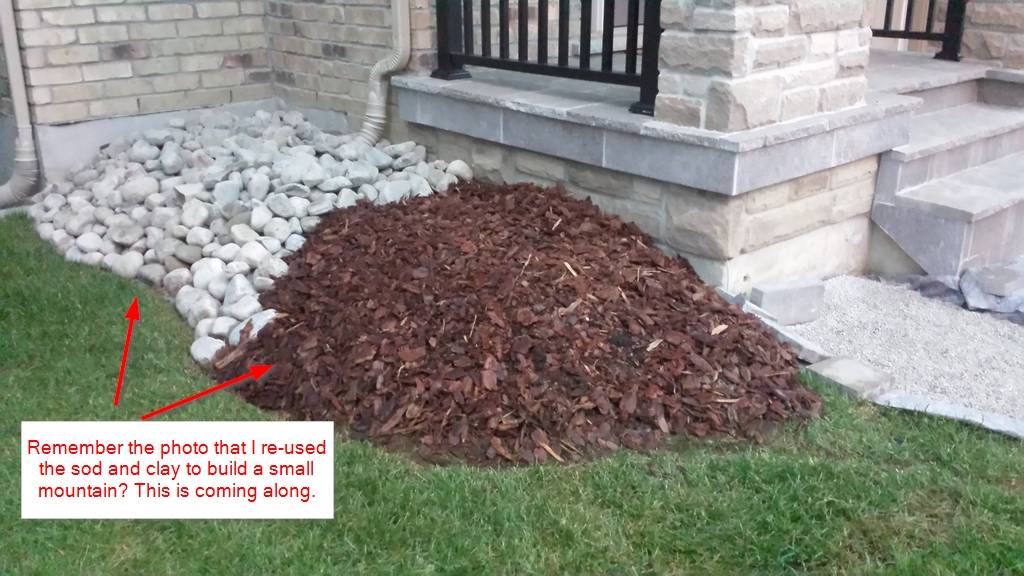
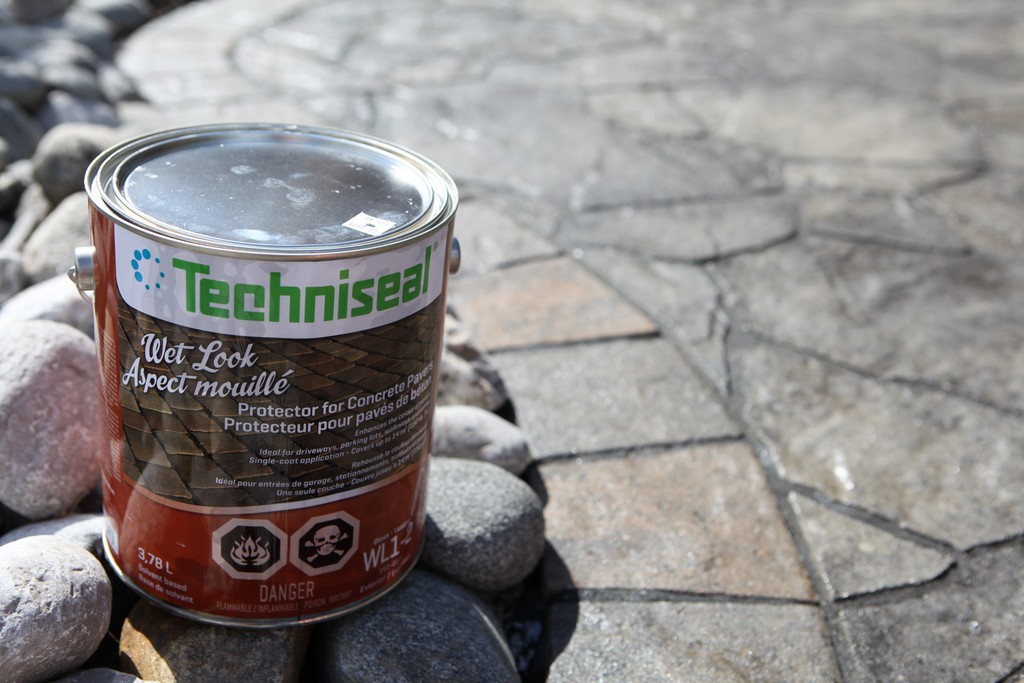
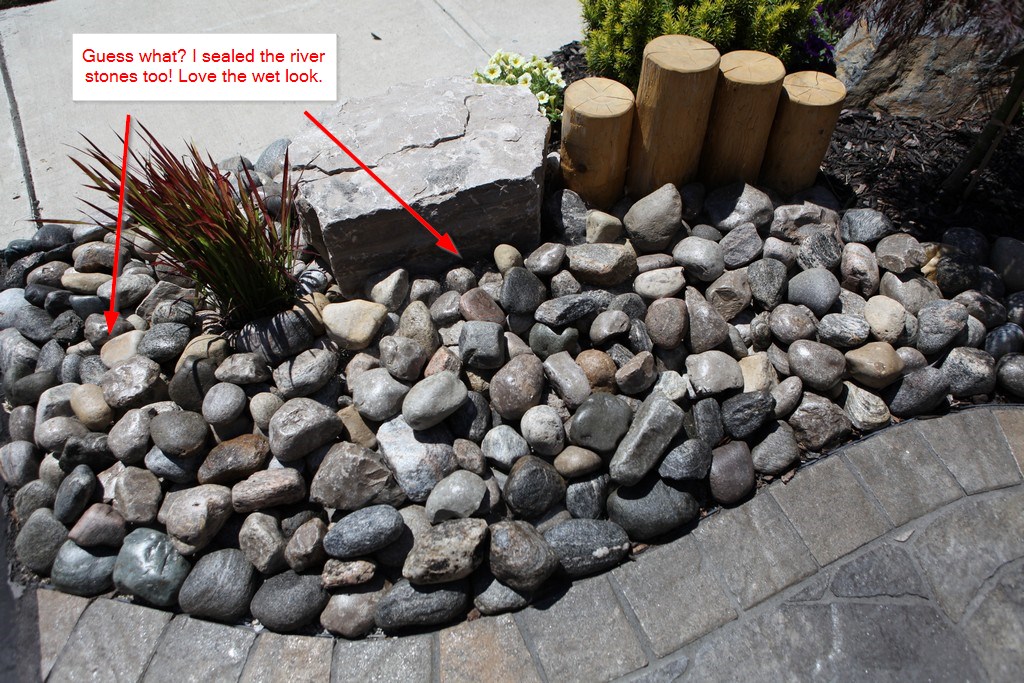
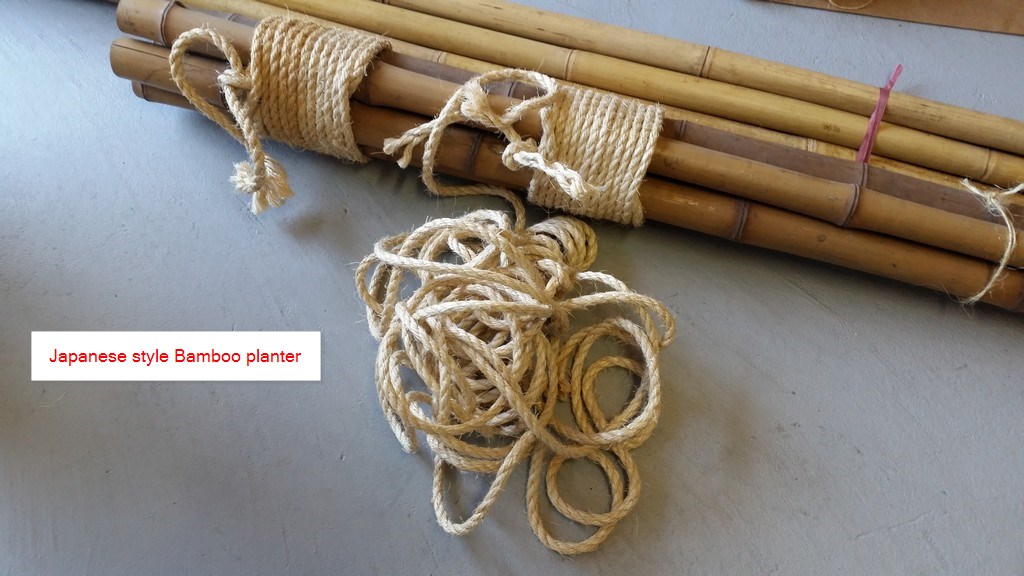
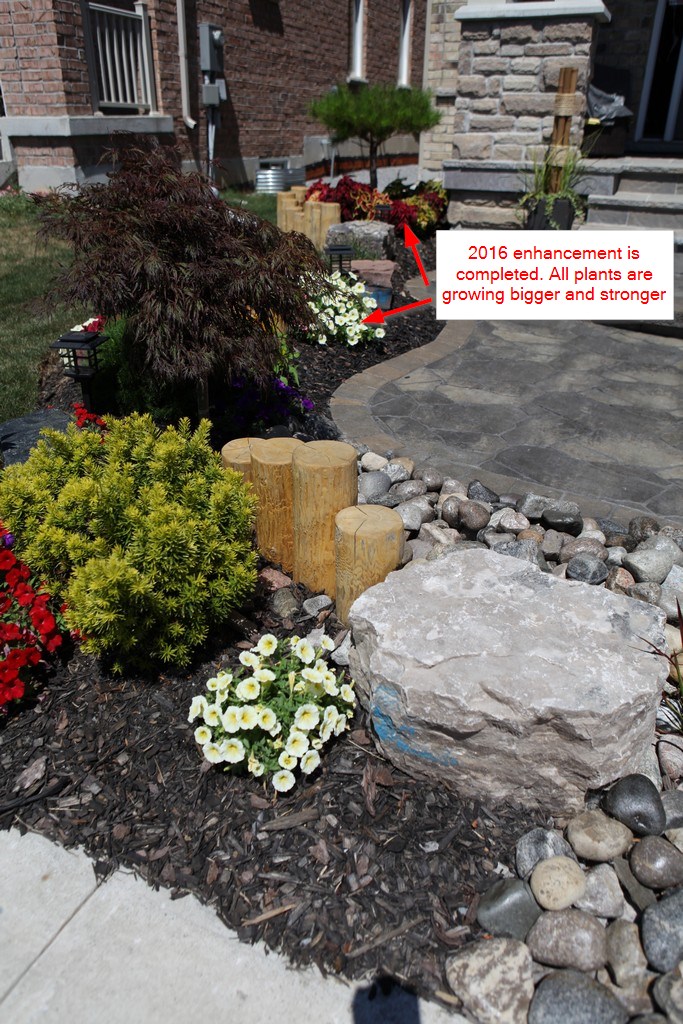
In 2016, there were couple of enhancement I did – I extended the area for more space to plant several more trees and shrubs. Then I used Techniseal wet look WL1-2 to seal the paving stone as well as the river rocks. Finally I bought some bamboo from China town and made a Japanese style planter. I also replaced the barks with the black color mulch to add more defined background color. The result looks amazing!
the rosebel, does it come in 2 or 4 pieces to make the block…I currently have basic slabs that measure 24×29″ and just want to use the current underlay and replace the slabs with the rosebel….
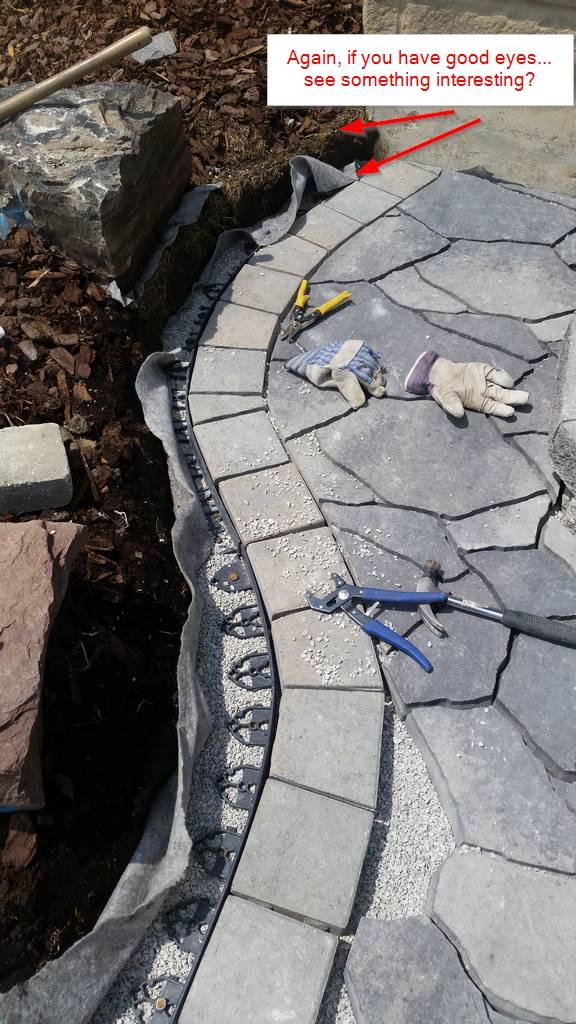
If you look at the Permacon tehcnical guide (one of the photos above), it basically comes in 2 shapes but then there are 2 different patterns, totally there are 4 distinct one. So, it is 4 pieces to make a block. But a block isn’t exactly a square or rectangle like the concrete slabs, so you will expect to have a lot of cutting even you want to fit into your existing layout.
Hi there,
Great work on the front porch all around and I was curious about one thing:
After you laid your pavers down, you appeared to have gone straight to sanding the joints and setting the polymeric sand. Did you compact the pavers? Did you compact the sand?
I am currently in the process of doing my walkway also, which will not be having any cars parked on it and I myself am wondering if renting a plate compactor is overkill when utilizing a HPB base.
Thanks in advance!
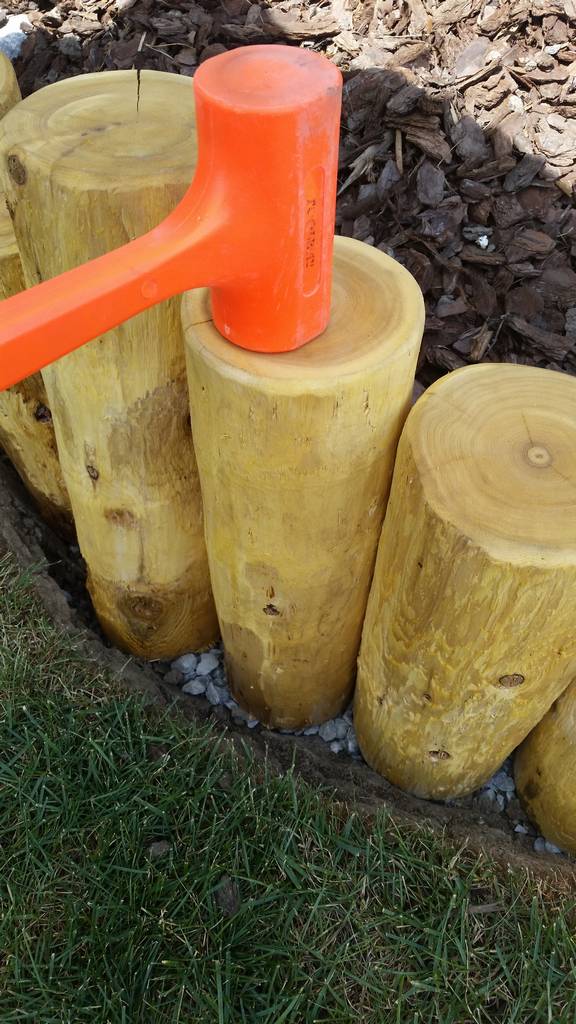
I used a rubber mallet, not a regular one. The one I bought is steel shot filled and it’s heavy (4 lb), you can see the orange color mallet/hammer in some of the photos. I bought it from the same landscaping place I ordered the pavers. Google “Orange Unicast Dead Blow Hammer 4 lb”, it is awesome. I did it last year and I can tell you there is no problem as of today, there is no sign of sinking and it’s rock solid. I have to say love HPB. It may be a bit overkill for a walkway with no cars parking on it, but I have seen people used plate compactor on the soil before/after they pour the HPB, maybe those are more for driveways. Hope that helps!
Thanks for the reply. I too use a 5lb deadblow rubber mallet to help level out the stones to how i see fit and due to HPB’s high compaction rate, I wondered if compacting it would make a difference.
Good to hear that you didn’t have to do it and as we share the same purpose (a walkway) i will forgo renting the plate compactor a second time. I rented it the first time for the soil and to tamp down the HPB and I honestly did not notice a big difference.
Thanks again!
Great read showing how to lay these heavy slabs. I would add a suggestion to consider buying a hand tool called SlabSetters (sold out of Canada but can be mail ordered). This inexpensive tool is designed precisely to lift and install these heavy slabs very accurately and gentle into position with causing back or finger injuries. https://slabsetters.com
Hello,
I love this project. I also like your YouTube videos. I have a similar ‘stone patio project’ I need to DIY. The area is 10’ x 40‘ and 12” deep (that’s nearly 400 ft3 of fill!). One side will be against the house foundation while the other three (3) sides will be against wood. I need to avoid long term wood rot (drainage considerations).
My questions:
-Recommended fill materials, type, height of each material, etc.?
-Drainage solutions on the wood sections (where the patio stones will meet the wood)?
Once this is taken care of (foundation), then I believe I can start laying the patio stones down.
Thank you in advance,
Jim
P.S.: is it possible to upload pictures so you can see ground zero?